Showing posts with label tutorial. Show all posts

Saturday, April 24, 2010

Tutorial: Adding Pleats-Sewing the Pleats

Wow! I can't believe it has been so long. Sorry for the wait for part 3. It has been a busy week (or 2).

On to the tutorial!

1. Fold the pleat in half so that the clips match up.

2. Sew right down the line that you marked for the pleat.
This picture shows 3 pleats that have been stitched along the lines.
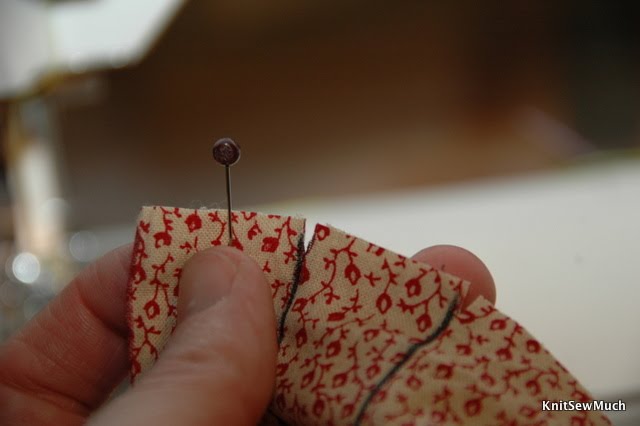
3. Keep pleat folded in half and put a pin in right on the fold.

4. Opening up pleat place pin against seam line. This forms the box pleat. Half of the pleat is on each side of the pin.

5. Baste pleats down inside the seam allowance.

6. Iron pleats down.

It should look like this picture when the 3 pleats are finished (I apologize if the pictures are a little difficult to see). The red line is the center front.

Well, that is how it's done. I hope you were able to follow my process.

Thank you for stopping by. Have a great day!

Until next time...

Saturday, April 10, 2010

Tutorial: Adding Pleats-Preparing the Fabric

This is part 2 of a 3 part series on adding box pleats to a garment that was originally drafted without. To see the dress I pleated click here. For part 1 about preparing the pattern click here.

On to part 2--Preparing the fabric

Once your pattern is completed you are ready to cut out your fabric.

On my project I wanted a box pleat right in the center of the dress so I added 1" to the center front of my pattern (right side). The picture below shows my new pattern placed on the fabric. Notice that the CF is not on the fold anymore. I added 2" total to the CF but when I stitch the pleat the excess will be taken out and the original CF will again be the actual CF of the dress. When the pleat is finished I will have 1/2 of the pleat on each side of CF.


After you cut out your pattern make clips at the top and bottom edge of each pleat. The red marks on my pattern shows where I clipped. When you clip make the clips big enough to find them but not enough to go past your seam allowance. In this garment my seam allowance was 5/8" so my clips were about 1/4''.


The next step is to draw your pleat lines. Draw with chalk (not marker) from the clip at the top to the clip at the bottom of each pleat. Note: I wanted my box pleats on the outside of my garment so I drew my lines on the right side of the fabric. If you want your box pleats on the inside of the garment draw you pleats on the wrong side of the fabric.


This picture shows my bodice piece with all the lines drawn in. The wider sections are the pleats.


The red line on the left side is my center front. The black lines on either side (actual center front from pattern piece) will be stitched together and the red line will be at the center of the box pleat. I will show how the pleats are stitched together in the next post.

To prepare the fabric for the skirt all I did was make clips at the top of each pleat because the skirt will not be pleated all the way down.

I hope that this was helpful. Please ask if you have any questions and I will try to clear them up. Stay tuned for part 3 coming soon.

Thanks for stopping by. Have a great day!

Until next time...

Thursday, April 8, 2010

Tutorial: Adding Pleats-Preparing the Pattern

As I promised here is part one of a tutorial on adding pleats to a garment. I am going to use my bodice pattern that I used for my daughters dress. You can use any pattern that you want. The method will be the same.

Note: You can see the white line a few inches up from the bottom. That is where I sewed the front band to the bodice piece to make a full bodice piece. McCalls 6020 had two separate pieces and I wanted only one. This had to be done before I began the pleating.

My pictures were taken after I already used this pattern so you will have to excuse the folds underneath.

Let's begin.

1) This is my original pattern piece. The center front fold is on the right. I drew 4 lines parallel to the center front. These lines are 1" apart. I want the box pleats to be 1" wide and to touch each other so 1" is the spacing that I need to make this happen.

2) I added 1" to the center front. When I cut this out I will now place the edge of the added piece on the fold. This will be my center pleat. When the pleat is made the original center front will still be the center front of my dress. For this pleat I only add 1" because it is on the fold. I am actually adding 2" (1" on each side of the fold) which is the width I need for a 1" pleat.


3) I drew horizontal lines so that I would be able to keep my pattern lined up correctly. I can see through my pattern paper to the grid lines on my board. The center front should be lined up on a vertical line. The two horizontal lines are perpendicular to the center front.

On a pattern without a center front to line up you can always use the grainline.

4) Cut along the first line. Carefully move your piece over 2" keeping the horizontal lines following the same line on the board. Add in paper to fill in the empty space. This is my first pleat (When made into a pleat all that is added will be removed).


5) Make all the other pleats in the same manner cutting on the subsequent lines. Here is my pattern piece with all the pleats added.


For the skirt back I didn't need to add any for the pleats. I just turned the gathers into pleats. I measured and drew lines so that my pleats on the skirt would match the pleats on the bodice. Here is a picture showing where I drew the pleats.


Well, I hope that this tutorial helps clarify how to add your own pleats. It is really easy to do. In the next post I will show how I prepared my fabric.

Thanks for stopping by! Have a great day.

Until next time...

Saturday, August 1, 2009

My Favorite Girl is 9 Today!

I can hardly believe that my firstborn child is 9 years old. Time has gone so fast. It has been quite an exciting ride. She is such a blessing from God and I am so thankful to have her!


She decided on a ballerina princess party for our extended family gathering. On Monday she asked me to make her a tutu to go with the theme. Of course I said I would. Armed with Joann's coupons we went to purchase pink and purple tulle. My original idea was to make the no sew version. But time became and issue and I decided that I could sew them up faster than I could cut 100's of strips (the plan was to make 3 tutus-one for her and her 2 and 5 year old girl cousins) and tie them on to the elastic. I was right. I was able to make each tutu in about an hour.


The skirts for my daughter and my 5 year old niece (not pictured) were made of about 4 yards of both pink and purple. The skirt for the 2 year old was about 2 1/2 yards each of pink and purple. I cut the tulle different for the 2 year old's skirt and I didn't like it as much so I will give directions for how I made the skirts for the older two. Construction methods were the same for all three skirts.

Tutu Tutorial

1. I cut the tulle in half lengthwise and then in half lengthwise again so I had 4 long strips of pink tulle and 4 long strips of purple tulle.

2. I stacked all the tulle on top of each other. I put all the pink on top of the purple for one skirt and then all the purple on top of the pink for the other. I found that the best thing was to pin the edge that I was going to sew together. It was easier to get the edges together before going to my machine.

3. I put my binder that clean finishes both edges and makes a 3/8" binding on my coverstitch machine. I used 1 1/2" strips of satin to bind one long edge. I decided on binding the edge to keep the tulle from scratching the girls.


The edge looked like this when finished.


4. I sewed a line of stitching about 3/4" under the binding. This became my casing for elastic.

5. Half inch elastic was threaded through the casing.

6. Lastly, I serged the sides to close up the skirt.

My daughter and her cousins loved the tutus. They were quite the hit.

Thank you so much for stopping by. Have a great day!

Until next time...

Saturday, April 12, 2008

Down and Dirty Darts

Darts can be difficult little things to sew. I usually do not have too much trouble with the simple triangles but my New Look shirt has some more complicated waist darts. My usual method for transferring dart markings to the wrong side of my fabric is by using tracing paper and a wheel. This proved to be not the most effective method this time.

This time I knew that matching up the lines could be difficult since it was in the middle of the shirt. I (thought I) got smart and decided to put the markings on both sides. This sounds great but it wasn't. Of course with all the moving of the fabric while placing the tracing paper it didn't get put back exactly in the same place and the lines didn't exactly line up. I also couldn't see where to stitch. What to do? What to do?
Here was my down and dirty solution. This is by no means the best way to mark darts but it worked for me. I should have thread traced the outline of the dart but for this muslin I did not want to take the time. I will thread trace on the shirts with the nice fabric.

First I basted the traced dart on my sewing machine. I still had my traced lines to follow. I only basted one side of the dart because the (cheap) fabric was puckering.
Then I matched the basted side of the dart with the traced side and pinned.

Last, I stitched the dart. Since it was thread basted I could clearly see the stitching line and could easily stitch the dart.
Voila! A nice dart. Not the best method but the outcome worked for me.

Thanks so much for stopping by and seeing how I make darts in a pinch. Have a great day!

Until next time...

Fabulous Foot Day

I have another foot that is for embellishment and whatever else you can think of. The foot for this week, the Open Toe Foot, has so many possibilities.
As you can see this foot is totally open so you can see exactly what you are sewing. None of the stitches are hidden. This is especially nice for decorative stitches, appliqu������ satin stitches, or zig zag type stitches. The red dot helps you guide so that your stitches are straight. Since the foot is open it is important to have your fabric wide enough so is is under both side feet. If you have fabric under only one side you may lose it in the feed dogs or wavy stitching lines. This is a great additional foot to have. It is not necessary but does bring a bit of ease to certain types of stitches. If you have a use for this foot that you love please let me know. I love to have new ways to use all these feet I have.

Thanks for stopping by. Have a great day!

Until next time...

Saturday, April 5, 2008

Fabulous Foot Friday (Well, close anyway)

I am amazed how quickly Friday comes and goes. One minute is is afternoon and then it is over. Well, I have to be honest. It flew by because I was throughly engrossed in finishing up my Burda skirt. And I did! I will post on it later today (if I don't get caught up in my New Look shirt that I am itching to get started on). Back to Fabulous Foot Friday.

For the next few weeks the feet that I will be showing to you are feet that I purchased because I thought they were so cool. I loved the effect that they created but I do not use them very often. These definitely are accessory feet. They certainly aren't necessary but are fun to have for options. This one today is one that I know a lot of people love (some couldn't live without it) but I have had a very hard time getting used to. I think I need more practice. Today's foot is the Narrow Hemmer Foot. I bought this because I thought it would make hemming so much easier and for many it does.

The Hemmer foot rolls and hems the edge of your fabric all in one step. How cool is that!! This one takes a little practice getting used to and you might have to slow down your sewing a bit. In the past I have had great difficulty sewing slowly. I bought this foot to make hemming easier and faster so I thought I should be able to sew fast, right? No. Slow and steady is the best method. Slowing down gives you time to make sure the the fabric is feeding into the guide correctly so the hem doesn't twist. Once you get the hang of using the hemmer foot at a slow pace I am sure that you will be able to speed it up later.

There are some great tutorials out there using this foot. Dawn at the Secret Pocket has a tutorial that is really good (I have so many of her posts saved in my bloglines). She gives a couple of links but I will also include them here. They are fantastic resources.

Threads Magazine: Mastering the Narrow Hemmer
Sew News: Fancy Footwork-Rolled Hemmer
Jan Andrea's Using a Hemming Foot Tutorial

Hemming Feet come in various sizes depending of the weight of the fabric and the size of the hem that you want. My foot is a 5 mm Narrow Hem Foot. It works for light-mid weight fabric. Cotton works great. I wouldn't use this size for heavier fabrics such as denim or corduroy. You would need a wider foot for those types of fabric.

How to use this foot:

To begin you must start your hem before placing underneath the foot. Use the hemming foot as a guide for how wide to begin the hem. It helps to pin the hem in place. Once you have it started place it under the foot and set the needle down to secure and check that the hem is very close to the edge. Your stitching should be very close to the folded edge. Stitch a few stitches to secure fabric and to insure correct placement.

Lift foot with needle down and place raw edge of fabric in the fabric guides. Lower foot and continue stitching guiding the fabric into the guide. It is very important the you keep the fabric curled even with the guide. Do not led fabric go under the edge of the right side of foot. The Threads article has some great pictures showing results of improper placement of fabric.


This is your finished hem on the right side.
This is the finished hem on the wrong side. Notice how close the stitching is to the edge.

This is obviously not a complete tutorial but I hope that it is enough to get you started thinking about Hemming Feet. They are a wonderful accessory to add to your sewing collection. With some practice I am sure that this foot will become a necessity.

Kat mentioned needing to get a special box for her presser feet. I thought I would show you how I have organized mine so that I know what I have and can access them easily. Originally this box was only for my accessory feet. All of my standard feet were stored in a box that was attached to my sewing machine. I recently removed this box from my machine to put a table to extend my sewing area. Now I have too many feet for this box and need to come up with a new solution.


Thank you so much for stopping by. Have a wonderful day!

Until next time...
Friday, March 14, 2008

Fabulous Foot Friday! Braiding Foot

On to a foot that is for embellishment. The Braiding Foot or Couching foot tremendously helps keep your desired embellishment to stay inbetween the zig zag stitching. This is the top of the foot.

This is the bottom of the foot. Notice the groove that guides. You can use many different things to embellish your project with this foot. This one is better with things that are thicker. I use ribbon in the photos but you can use yarn, fabric strips or tubes, or flat trim. There are other feet that work better with thin yarns and threads.


Start with the ribbon (or whatever you choose) through the guide hole and under the presser foot. Select a zigzag stitch that is your desired width. You have some creative license here. You can have your stitches catch the edges, go off the edges or even be decorative down the middle. I chose to have my stitches go just beyond the edge of the ribbon.

As you can see in this last picture the ribbon is completely encased by the stitches. Another great application for this foot is a thread casing for thin elastic. This is an easy way to make an elastic cuff or waistband. Simply zigzag directly over the elastic before sewing up side seams. Make sure that your stitches do not catch the elastic. Once elastic is stitched in place you can pull it up to the desired finished width. Then sew the side seams catching the elastic.


I hope you enjoyed learning a little more about this foot. I am sure that there are many great ways to use it. If you have a favorite way that you use this foot please let me know. I would love to have even more applications for this foot.

Thank you so much for stopping by. Have a great day!

Until next time...

Saturday, March 1, 2008

Fabulous Foot Friday--Zipper Foot

This week I have been enchanted with my Narrow Zipper Foot. I have been putting in zippers with the one that came with my machine for quite a few years. I did not have too much trouble doing it. I did have to figure out some tricks to get by the zipper pull but once I did putting in a zipper wasn't too bad. Well, for me it just got even easier. Here is a picture of my two zipper feet. The one on the left is my narrow zipper foot and the one on the right is the one that came with my machine. Notice how different they look. It used to be difficult for me to maneuver the wide one past the pull and it could be a challenge to get right up next to the teeth. With my new narrow foot it is SO much easier. I couldn't believe the difference until I was putting in a fly zipper last week. It went slick as a whistle past the pull. My life has taken a new direction where zipper insertion is concerned.

Let me tell you where I first heard about this magical foot. I was in Puyallup, WA last year for the Sewing Expo. I went to a zipper seminar by Rosebud. She is an instructor for Islander Sewing Systems and was teaching her factory methods for putting in zippers. During the seminar she showed us how to put in a slot zipper and stressed the importance of having a narrow foot. I purchased her DVD Easy Zippers because I really liked how easy she made zippers look. The DVD also came with a universal narrow zipper foot. Well, I tried her foot and was not exactly pleased with it. I liked how I was able to maneuver the foot but I did not feel like it fit my machine correctly. So, finally after my uses ending up in total frustration I searched out a narrow foot that was made for my machine and that has made all the difference. I am a firm believer in this foot. Now, if you are still using the wide foot (most of you are probably already using this foot) then go check out a narrow one. I am sure that you won't be sorry.


Before I forget, let me also tell you that I love the Easy Zipper DVD. I put in my first fly zipper and it turned out beautiful the FIRST time. She does a great job explaining in a very detailed way how to put in many different kinds of zippers.

Thank you so much for stopping by. Have a great day!!

Until next time...

Wednesday, February 27, 2008

Adjustable Waisband Tutorial

I recently made a skirt for my daughter who is very thin. She pretty much must always have an adjustable waistband in her skirts and pants. I decided to try to make her an adjustable waistband for this skirt since so that it would last a little longer. It was so easy I couldn't believe it. Here is how I did it but some steps can be done in a different order.

1. Attach interfaced waistband to skirt. The picture on top shows the inside of the skirt.
Press seam allowance toward waistband. The picture on the bottom shows the outside with the waistband pressed up.


2. Decide where you would like the the elastic waistband to end. I wanted mine to end at the side seam so I placed the buttonhole at this point. Place buttonhole on the top section of the waistband. This will fold down to the inside. When placing the buttonhole make sure that you allow for folding up the inside raw edge. (If you know where you want buttonhole this step can be done before attaching to waistband.)


3. Sew button next to buttonhole and cut open buttonhole. It is much easier to do this before you stitch waistband down (ask me how I know).


4. Fold up raw edge and topstitch waistband. Stitch on the right side making sure that you catch the waistband on the inside.


5. Cut elastic. It should be long enough to button on each side with out stretching plus 1" on each side to turn under. Insert elastic and button. (The front of the skirt is to the right)


Here is the finished waistband:
My daughter can pull the elastic out and button it so that the back gathers up making the skirt smaller. Because I stopped the elastic at the side seams the front of the skirt lays flat.


I hope this makes sense. If you have any questions please ask. Thank you so much for stopping by. Have a great day!

Until next time...

Friday, February 15, 2008

Fabulous Foot Friday! Piping Foot and Tutorial

On to a new style of presser foot today. Introducing.....


The PIPING Foot!!

This is another one of my favorite feet. I do not think that I could live with out it. It is fantastic for making your own piping or attaching ready made piping. It looks like any other foot from the top. It is the underside that makes it magic. As you can see from the picture there is a large groove that the piping fits into perfectly. This groove guides the corded side and stitches exactly alongside without any difficulty. I thought I would show you exactly how it works.


Make your Own Piping Tutorial:

Step one:

Cut out strips. You will need the width of your seam allowance times 2 plus 1/4 inch (this does depend on the width of your cording). If you will be placing the piping on a curved seam such as collars, waist, or wrist it is very important that the strips are cut on the bias. The stretch of the bias is necessary to lay flat on curved area. If you need longer length just sew two or more strips together using a small seam allowance (1/4 inch or so).


Step Two:

Fold strip around cording wrong sides together so that the cut edges meet together. If you need to iron a fold before inserting in order to know exactly where to place cord you may do that. Cording needs to be snuggly placed in the fold. You want your piping to be as tight as possible.


Step Three:

Place the cord under the presser foot so that the cord is right in the groove. Adjust your needle position so that you stitching line will be right next to but not through the cord. Stitch the entire length of piping.


Step Four:

Remove from machine and you have perfect piping ready to apply to any project.


Thank you so much for stopping by.

Have a great day!!

Until next time...