Thursday, February 28, 2008

Ready To Wear Contest at Pattern Review

I finally decided to enter the RTW Contest over at Pattern Review. It ends on Friday evening. I am really late but I wanted to do it anyway just so I would finish this project. I am going to recreate this jumper by Oiliy for my daughter. My version will be using lime green baby cord that I purchased specifically with this project in mind (this purchase was made before my fabric fast which tells you how long I have been procrastinating ). The contrast will be a lavender and lime plaid that I bought about 6 years ago. I used it for an adorable outfit for my daughter when she was a toddler but I still had quite a bit left.

I picked this because it will challenge me but not be too challenging. I did not find a pattern that was close to this style so have to alter another pattern quite a bit. This will definitely be the challenge for me. I have not really done this before. Once the pattern is made they the construction will be easier.

Stay tuned for some pattern alterations.

Thanks so much for stopping by. Have a great day!

Until next time.

Wednesday, February 27, 2008

Adjustable Waisband Tutorial

I recently made a skirt for my daughter who is very thin. She pretty much must always have an adjustable waistband in her skirts and pants. I decided to try to make her an adjustable waistband for this skirt since so that it would last a little longer. It was so easy I couldn't believe it. Here is how I did it but some steps can be done in a different order.

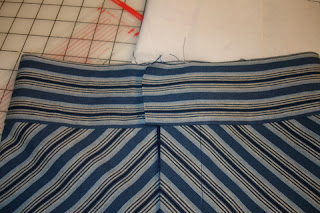
1. Attach interfaced waistband to skirt. The picture on top shows the inside of the skirt.
Press seam allowance toward waistband. The picture on the bottom shows the outside with the waistband pressed up.


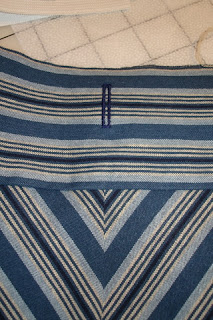
2. Decide where you would like the the elastic waistband to end. I wanted mine to end at the side seam so I placed the buttonhole at this point. Place buttonhole on the top section of the waistband. This will fold down to the inside. When placing the buttonhole make sure that you allow for folding up the inside raw edge. (If you know where you want buttonhole this step can be done before attaching to waistband.)


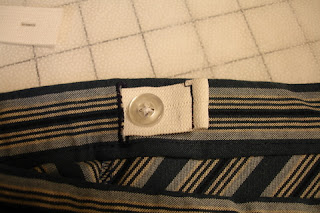
3. Sew button next to buttonhole and cut open buttonhole. It is much easier to do this before you stitch waistband down (ask me how I know).


4. Fold up raw edge and topstitch waistband. Stitch on the right side making sure that you catch the waistband on the inside.


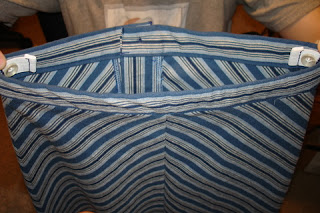
5. Cut elastic. It should be long enough to button on each side with out stretching plus 1" on each side to turn under. Insert elastic and button. (The front of the skirt is to the right)


Here is the finished waistband:
My daughter can pull the elastic out and button it so that the back gathers up making the skirt smaller. Because I stopped the elastic at the side seams the front of the skirt lays flat.


I hope this makes sense. If you have any questions please ask. Thank you so much for stopping by. Have a great day!

Until next time...

Sunday, February 24, 2008

Fur Rondy Fun-Canstruction

Well we had some fun yesterday out and about enjoying Fur Rondy events. First, we went to an event that we got to go to different booths and learn about countries around the world. It was great for my kids to see all the different cultures. The had passports that they got stamped at all the different countries. We get to see dancers from different countries and that was really neat.

Next, we went and saw Canstruction which is different structures made out of canned food. This was a fun event that benefits the local Food Bank. I took a couple of pictures.


Can you figure out what these are? The one on the left is a snowmobile and the one on the right is a bear with salmon and birch trees behind him.

We ended our evening with fireworks. We have a very humble display but we still enjoyed it.

Thank you for stopping by. Have a great day!

Until next time...

Fabulous Foot Friday Finally on Sunday

This episode brings to you a very basic foot: The 1/4 Inch Foot or Piecing Foot.


This is a very basic foot and I use it all the time. It is not just for piecing. I use it anytime I need a quarter inch seam. I really like all the markings as guides. Even though my basic foot can do the same thin as this foot I am really glad that I have this one for a little better accuracy and I do not have to adjust my needle position.

Knitting Update: I am finished with the back of my sweater and am heading on the to the front.

Thank you so much for stopping by. Have a great day!

Until next time...

Saturday, February 23, 2008

Fabulous Foot Friday Postponed

Sorry for the delay but Fabulous Foot Friday will have to be postponed until later today or tomorrow. Yesterday evening (when I usually am able to post) my husband took me out for dinner. We don't get to do this often so we had a lot of fun. Today I have a few fun things planned for the family. Every year in February we have a winter festival called the Fur Rendezvous (Ron-dee-voo). Tons of events are planned from balls to dog sled races to pancake feeds. It takes place all over Anchorage. We are going to do some of the fun things. We missed the parade, and the dog races but there is still plenty left. Maybe I will take some pictures.

So, until later today (hopefully)...

Friday, February 15, 2008

Fabulous Foot Friday! Piping Foot and Tutorial

On to a new style of presser foot today. Introducing.....


The PIPING Foot!!

This is another one of my favorite feet. I do not think that I could live with out it. It is fantastic for making your own piping or attaching ready made piping. It looks like any other foot from the top. It is the underside that makes it magic. As you can see from the picture there is a large groove that the piping fits into perfectly. This groove guides the corded side and stitches exactly alongside without any difficulty. I thought I would show you exactly how it works.


Make your Own Piping Tutorial:

Step one:

Cut out strips. You will need the width of your seam allowance times 2 plus 1/4 inch (this does depend on the width of your cording). If you will be placing the piping on a curved seam such as collars, waist, or wrist it is very important that the strips are cut on the bias. The stretch of the bias is necessary to lay flat on curved area. If you need longer length just sew two or more strips together using a small seam allowance (1/4 inch or so).


Step Two:

Fold strip around cording wrong sides together so that the cut edges meet together. If you need to iron a fold before inserting in order to know exactly where to place cord you may do that. Cording needs to be snuggly placed in the fold. You want your piping to be as tight as possible.


Step Three:

Place the cord under the presser foot so that the cord is right in the groove. Adjust your needle position so that you stitching line will be right next to but not through the cord. Stitch the entire length of piping.


Step Four:

Remove from machine and you have perfect piping ready to apply to any project.


Thank you so much for stopping by.

Have a great day!!

Until next time...

Thursday, February 14, 2008

Keep Warm My Little Valentines!

It has been fairly cold up here lately. Well, we have actually had a heat wave the last day or so. Today it was up to 30 degrees. But it has been quite cold and the downstairs where we sleep is quite cold. It is always about 10 degrees colder than upstairs. While this is great during the summer it can be a little chilly during the winter. My daughter wears multiple layers to bed as well as having a sheet, quilt, 2 light down comforters and often another blanket on her bed. She still will say sometimes that she was cold. So when I saw these rice pillows on Wise Craft I knew that I had to make one for her for Valentine's day. And of course I had to make them for my sons too because they would inevitably want one since she got one. Here are my children with their new rice pillows to keep them warm during the rest of this winter.

Other crafting updates:

I finished a knit shirt that I like that I just need to take a picture and then I will post.
I am on the last cuff of the cardigan sweater that I am knitting. As soon as I finish I will go buy some of the gray yarn. I am really looking forward to that. I LOVE this yarn.
I am working on a little girls outfit. I am trying a couple of new techniques on the skirt that I will share with you later.

Thank you so much for stopping by. Have a GREAT day!

Until next time...

Friday, February 8, 2008

Fabulous Foot Friday!! (It is still Friday in Alaska.)

For one last week I am continuing on my top/edgestitching theme. Can you tell that I need a lot of help in this area? Anyway, today I am going to show you the Edge Joining Foot.
As you can see from the picture this one is a little different because it has the guide right in the middle. I LOVE this foot for stitching in the ditch. It really helps get your stitch right along the seam. Holding the fabric on each side of the seam helps open it up to get the stitches right down in there. You can see the seam with stitching in the ditch on the right in the next picture. The other use for this foot is for snugly joining two edges of fabric together. This is especially nice for lace or trim insertion. I used a zigzag stitch. You can see how it is directly over the middle of the two pieces. The seam is surprisingly strong when pulled on.


Totally unrelated to sewing but I just had to include this picture of my little superhero.


Thank you so much for visting! Have a great day!

Until next time...

Monday, February 4, 2008

Bounce! Bounce! Bounce!

I apologize for neglecting Fabulous Foot Friday. Last week was a crazy week and was not able to do my regularly scheduled blogging. Never fear! It will be back this week.

Now on to this post:

I chose the title for this post because it accurately describes my crafting. All I seem to do is bounce from one thing to another (well, mostly between sewing and knitting right now). Just a couple of weeks ago I was totally into sewing. I had about 5 projects that I wanted to complete ASAP. I finished one (VERY DISAPPOINTING!!! Terrible fit. Maybe someday I will stop being so tormented by the shirt I will take a picture and show it to you) sewing project and was ready to go directly on to the next. In fact, I have figured out exactly what adjustments need to be made to the pattern. That's been done for at least a week. Did I get right to adjusting the pattern, cutting out the fabric and sewing? NO!! I went to knitting. I was working on the sweater for my husband and did I finish that? NO!!! (In my defense I do not have enough yarn and am trying to find some so the drive is not there right now since I cannot really finish.) I started working on another sweater. I am now knitting the Silken Spencer by Kate Gilbert from the Fall 2006 Interweave Knits.
I love the grey and I have chosen navy blue as the contrast. The flowers will be burgundy. I am using Lousia Harding Kashmir DK and am LOVING the yarn. It is fabulous to knit with. So far I have the back contrast band and one front contrast band finished. They have been so quick to knit up. I am learning intarsia for this project. It has been fun learning this new skill.

Maybe I will be able to see this project through to completion before I bounce, bounce, bounce to something else. I am not so sure because I think I feel the sewing bug about to bite again.

Have a great day! Until next time...