Sunday, August 30, 2009

Burda 7-2009-104 My Plaid Shirred Dress Finished!

I was determined to get this dress finished to wear to church this morning. Last night, at about 11 PM, my husband came in and asked if I was going to be finished soon. I told I thought I would be finished soon. Silly me! I finished 5 hours later. Guess I not a very good judge of how long my projects take. I really enjoyed this project. I learned a lot. As I said before there were many parts that I had never done before. I thought I would take you through how they went.

1. Shirring-I used elastic thread and zig zagged over it. I really liked my plaid fabric. I was able to follow right along the line which made it very easy. I was pleased with how easy this was to do.

2. Welt pockets-These went pretty well. I used "Sew any Set in Pocket" by Claire Shaffer to help. One of my pockets looks pretty good (picture below) the other one overlapped a bit at the end. I liked how the had me construct the inside of the pocket. Burda's instructions were understandable for someone who hasn't done it before (me).

3. Flat Felled Seam-Boy, did I have trouble with this one. For some silly reason I had great difficulty getting my head wrapped around this one. Finally, I remembered to look in "Shirtmaking" by David Page Coffin for some help. After a few attempts I finally got something that resembled a flat felled seam. This was definitely the biggest stretch on this project.

4. Collar with stand-I referenced "Shirtmaking" for this also. Understanding the pictures took a bit but finally I got a collar that turned out really well. I really liked this method. My edgestitiching actually looked pretty good on the inside doing it his way.

5. Blind Hem-Just as I was about to hem the dress I decided to do a blind hem (about 3 AM) that I had never tried before. I consulted my sewing book by Simplicty to find out how to do it. It was so easy! I had no idea. It looks great on my dress.


So, here it is. My plaid shirred dress: Burda 7-2009-104.

Front of Dress

Back of Dress

Pattern Description: What an enchanting, feminine shirt-waister! With roll-up raglan sleeves front button fastening and lightweight fabric it's sure to become one of your favorites. Elastic shirring at the sides gently sculpts it to your waist.

Pattern Sizing: 36-44 My bust measures a size 40 while my waist and hip measure size 44. I decided to make size 40. I didn't want there to be too much fabric since I was using a heavier fabric than suggested. I really like how it ended up fitting.

Did it look like the photo/drawing on the pattern envelope once you were done sewing with it? It looked very much like the picture.

Were the instructions easy to follow? They were kind of easy to follow. I liked the pocket instructions (I did use other sources for the actual welt part). Now that I am looking back at them they are quite sketchy. They are fine if you know how already to do the different parts of the construction. Since I didn't know how to do the welt I looked at another source.


Welt Pocket
I also used Shirtmaking by David Page Coffin with pictures for constructing the collar.

Collar with Stand
I was able to easily construct the dress (with a bit of extra help) so the instructions were easy enough.

What did you particularly like or dislike about the pattern? I liked so many parts but my favorite is the waist shirring.
Front Shirring 
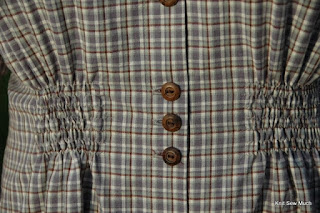
The raglan sleeves were very easy. This pattern is drafted very well. All the pieces fit together perfectly.

Fabric Used: Cotton woven plaid. I really liked using the plaid. This really helped keep everything on grain. I was able to match the front and the top arm seam. I also matched the collar and stand.

Pattern Alterations or any design changes you made: I didn't change anything.

Would you sew it again? Would you recommend it to others? This is a great pattern. I really liked the finished result. I probably wouldn't make a second of the same design though. Another great thing about this dress is that it can really look different in so many ways. Check out Christina's version and Dawn's version to see two other very different looks.

Conclusion: Great dress! This was a fun challenge to make. I hadn't done shirring, welt pockets, or flat felled seams. I have made shirt collars before but not very well. This was my first try with Coffin's method. It turned out well for my first try. I am very pleased with this dress. I think it will become one of my favorites just like Burda said.


Thanks so much for stopping by. Have a blessed day!

Until next time...

Wednesday, August 26, 2009

It's Been Slow Goin'

Just thought I would check in. I was able to spend some time on the Plaid Shirred Dress on Saturday. I was able to get the shirring and the welt pockets completed. The both look pretty good and I am happy with how they turned out. I haven't had a chance to work on the dress since then. I am hoping to have some time tomorrow. I need to get it finished soon because my daughter is very anxious to have me make a fall jacket for her.

Hopefully, I will have something to show you soon.

Thanks for stopping by. Have a great day!

Until next time...

Saturday, August 22, 2009

Burda 7-2009-104 My Plaid Shirred Dress in the Works

I love reading other sewers blogs! I have been inspired so many times by what other people make. They will make up patterns that I saw but didn't pay any attention into something fabulous. That is exactly what happened to me with this dress.

When I saw it in the magazine I didn't pay much attention to it. Then Christina made it and I thought her version was very cute. Then Dawn made up her version and hers was great too. So I decided to give it a try.

After I decided I was going to make this dress I had to find some fabric. Since I wanted to pull from my stash I decided on trying a plaid that I have had for a while. I have always really liked it but haven't had any inspiration for it. This one is not too heavy with nice body and drape. I have seen a lot of plaid lately so I think it is still in. I also figured that If I didn't like it for this dress the pieces are big enough that I could refashion it into something else. I draped it over myself to get the effect of the dress and I liked the initial look.

Now, there are many things about this dress that I have either not done before or am not very good at. This will be a real skill builder even if it doesn't turn out right.

Have not done before:
1. Shirring
2. Welt pockets (Christina and Dawn didn't do them. I would like to try. It depends on how the pocket placing falls on the plaid.)
3. Flat Felled Seams (Now I will finally take the time to try out the flat fell foot I bought a while ago.)
4. Raglan sleeves (I don't think these will be any problem. I am good at sleeves.)

Things I am not very good at due to lack of experience:
1. Shirt collars with stands
2. Pockets
3. Matching plaid

So this project will definitely be an experiment and a fun challenge at the same time.

I cut it out of muslin already to see if I even liked the style on me. I cut size 40 because I didn't want tons of gathered fabric. The shoulders and bust fit beautifully. I did have to take an inch out of the length so that the shirring was at my waist. But that is it. I am off to cut it out.

Thanks for stopping by! I hope you have a great Saturday.

Until next time...


Friday, August 21, 2009

Road Trip: South Dakota--From the Badlands to the Border

It has been a little bit since I have done a road trip post. This post will focus on our couple days we spent driving from the Badlands in South Dakota to the border of South Dakota and Minnesota. We saw some amazing things!

1. Badlands National Park--We didn't do much other than enjoy the amazing scenery. We drove the Badlands Loop Highway (Highway 240) through the park and were amazed at what we saw. For miles on one side all we saw was prairie. On the other side the prairie drops off hundreds of feet to the prairie below. In between the two levels are these amazing dirt/rock formations that were 100's of feet high peaks. They looked like if you walked on them they would crumble. There were fascinating stripes of colors through the "mountains". The stripes of different types of rock were amazing. I know I am saying amazing a lot but I just can't think of any other way to describe this. You will just have to look at the pictures which really don't do it justice.
The drive through the Badlands was really neat because some of the time you are at the top of the "mountains" and you looked down on everything. Other times you were at the bottom and you could really see how tall they were.

2. Wall Drug--In Wall, SD just a little way from the Badlands off I-90(I think). We saw cryptic signs for this place miles, and miles, and miles before we were even close to Wall Drug. They really peaked our interest with, "Coffee 5 cents Wall Drug" or "Free Ice Water Wall Drug." This is one crazy place. It is HUGE! You go inside and it is like a frontier town main street. Each store has a store front like you would see on a street. There are different types of stores-bookstore, western wear, shoes, apothecary, and so much more. If you take a side hall way you go into this drug store like place with a huge crazy assortment of different stuff-trinkets, souvenirs, health and beauty items, candy, and lots of other stuff. Then you walk into the ice cream parlor and their dining room. The dining room was huge! We had to have the full experience so we ate there. It was a bit expensive and the food was decent. If you can find you way out to the back there is a strange assortment of stuff. This is a fun area for kids. There is a covered wagon, giant jackalope, giant dinosaur and other things. I think this was called the backyard. Then you can walk into the back building and do some mining, play some video games, shop at the toy store or try not to be eaten by a large, smoke-breathing t-rex. I know this all sounds weird and it was. We spent a few hours here just looking around. It was quite an experience. RoadsideAmerica.com has a good page telling about Wall Drug.

3. Corn Palace--As I told my husband as we were driving through South Dakota, South Dakota creates its own tourism. The Corn Palace is no exception. This is a large building in downtown Mitchell. It is attached to the city hall. The cool thing about this building is that the outside is covered completely in organic products-corn, grain and grasses. They had created pictures out of corn and stuff. It is a very interesting sight. We didn't go in but I think they have some info and a movie inside about SD agriculture. Again, RoadsideAmerica.com has some info about this attraction too.

This ends this road trip post. I hope you enjoyed these interesting activities. My next road trip post will focus on Minneapolis, MN, our last stop on our few thousand mile trip.

Thank you for stopping by. Have a great day!

Until next time...


Thursday, August 20, 2009

Brown Velveteen Pant--Ottobre 4-2007-32

This is the first pair of Ottobre pants I have ever made. I know that I already posted my son's pants but I made these first. It just took me longer to get pictures of these. These pants were quite a project. They weren't really difficult. They just took careful precision in order to make them look great. I really enjoyed the challenge of making these. I think this is the first real pair of pants (jean, cargo style) I have ever made (I am not counting easy elastic waist pants).

This is my daughter again on her first day of 4th grade. She is wearing the Velveteen pants along with her tunic top I already posted about.

While making these I used techniques that I have never done before in order to be very precise. In order to place the back pockets in the correct position I used tailor tacks. Prior to this project I never wanted to bother with using these to mark my fabric because they were time consuming. This time I didn't want to mark up my fabric with anything so this was the best option. The other thing I did was thread trace my darts. Again, I never bothered thread tracing due to taking too long. It really didn't take too long and it made the darts so easy to sew.

There was quite bit of topstitching on all the seams and pockets but it sure made the pants look great. It is difficult to pick up all the details in the pictures. I tried to lighten up the pictures enough so you can see the details. The actual color is a dark chocolate brown.

Ottobre 4-2007-32

Pants Front

Pants Back

Pattern Description: These pants are pepped up with lots of topstitching, bar tacks and bottom-leg trims with rows of buttons. The back-pocket facings and facings for the leg-pocket flaps are cut from printed floral cotton poplin. the knee panels are gathered at the sides, both for looks and added comfort.

Pattern Sizing: 134-158 I made a 134 width and 146 length. I knew this would be big in the waist but thought I would put in an adjustable waist band.

Did it look like the photo/drawing on the pattern envelope once you were done sewing with it? My pants looked just like the picture.


Were the instructions easy to follow? They were fairly easy to follow. I had a little bit of trouble with the fly zipper because no measurements were given.

What did you particularly like or dislike about the pattern? I like all the details in these pants. The pockets are so cute.

Cargo Side Pockets
Back Tulip Pockets

I was even successful with the tulip back pockets with their method of application. I found it was important to edgestitch very close to the edge so that my light colored facing fabric didn't show at the edges.

Fabric Used: Polyester that is like velvet on the right side and slippery on the wrong. It is a very drapey fabric. I am not sure the exact name for this fabric.

Pattern Alterations or any design changes you made: I didn't add the bottom leg trim. I also didn't follow their instructions for the waistband. I stitched the waistband and top of pant right side together and turned to inside. Then I stitched knit binding on the bottom edge of the waistband,turned it to the inside and then stitched the waistband from the right side to finish it off.

Would you sew it again? Would you recommend it to others? I would certainly recommend this pattern. It makes an awesome pair of pants that look very RTW. I didn't think these were difficult but I did have to take my time and be as precise as possible.

Conclusion: The extra time put into these pants was well worth the great result. Attention to detail is very important for making these pants a success.


These are great pants I probably will make another pair. Next time I will remember to put in the adjustable waist before topstitching the whole thing. They are a little big on my daughter now. I took some large tucks in the waistband in order to get them to fit her. You can't see the tucks at all since her shirt is so long.

Thank you so much for stopping by! Have a wonderful day.

Until next time...

Wednesday, August 19, 2009

Funky Flower Tunic--Ottobre 4-2007-31

This is another pattern that I have been wanting to make for quite a while. I thought this would be a perfect first day of school outfit-short sleeve since it is still kind of summer and cute pants. I will write about the pants in a later post. My daughter really like this and was actually excited for me to finish. Here she is on her way to her first day of 4th grade.


Ottobre 4-2007-31


Pattern Description:
The tunic with sweet puffed sleeves can be worn on its own or paired with a turtleneck. a single-jersey belt tied around the raised waistline highlights the empire cut of the tunic.

Pattern Sizing:116-152

Did it look like the photo/drawing on the pattern envelope once you were done sewing with it? Yes! Mine was longer because I added length.

Were the instructions easy to follow? This is very simple to put together so I didn't use the instructions too much. The seemed very easy to follow when I read through them.

What did you particularly like or dislike about the pattern? I liked the styling.

Fabric Used: Knit blend probably poly, rayon or something. It is a thin knit that is very drapey. This pattern would work well with many different types of knit from lightweight to heavier. I bought it from the Michael Levine upstairs room full of boxes of extra fabric in Los Angeles, CA.

Pattern Alterations or any design changes you made: None

Would you sew it again? Would you recommend it to others? Yes I would sew this again. It is very cute.

Conclusion: A very quick top to sew up that turns out very well. I like the longer length so my daughter can wear it with the pants (I also made the ones pictured with this tunic in the magazine) or leggings.

Thanks so much for stopping by. Have a great day!

Until next time...

Tuesday, August 18, 2009

Ottobre "Kalle" Outdoor Pants


I have been very busy the past few days sewing, sewing, sewing. My children started school today and I finished some things for them to wear on their first day. This first post will be about my son's pants. There will be posts to follow the next couple of days about my daughter's outfit.

My 7 year old son told me a week or so ago that I needed to make something for him. Well, of course I am going to make something for him. Ottobre has so many awesome patterns for boys so I turned there first. Actually, I knew exactly what I was going to make for him. I had been wanting to make these pants for quite a while. While I was in Portland in March I made sure I went to Rose City Textiles because I wanted some fabric for these pants. I ended up finding some fantastic dark grey Supplex in the Annex.

Ottobre 4-2008-24 "Kalle" Outdoor Pants

Front
Back

I thought these would actually be harder than they really were. This project took me about 7 hours from tracing to completion. This pants were a joy to make even though the side seams and hip pockets had 5 rows of topstitching and all the other places had three.

Front Pocket and Topstitching
I am actually in awe that I finally made a pair of awesome boys pants from Ottobre. I can't wait to try another pair.

My complete review:

Pattern Description: The pants sewn from lightweight outerwear fabric have logs of beautiful details, including pleats on roomy back pockets, knee pleats on pants front and bar-tacks stitched with contrast-color thread. They also have multiple topstitching in various colors.

Pattern Sizing: 104-134 My son is taller and thin (his height is b/w 122-128 with his waist/hip between 104-110. Thank goodness for multiple pattern sizing. I cut the top at 122 with the width 116. Then I cut out 128 at the bottom. The pants ended up fitting him great. Next time will cut all length 128.


Did it look like the photo/drawing on the pattern envelope once you were done sewing with it? My finished product looked very much like the photo except my knee pleats don't hold in quite as well. They still look good though.


Were the instructions easy to follow? The instructions were good. These seemed to be more detailed than some other Ottobre instructions I have used.


What did you particularly like or dislike about the pattern? I love these pants. They have such great details. I love the pleats and all the topstitching even though it took a bit of time the effect was well worth the time.

Knee Pleats

Back Pocket Pleats


Fabric Used: Supplex from Rose City Textiles in Portland, OR

Pattern Alterations or any design changes you made: I didn't change anything except I didn't put on the belt loops.

Would you sew it again? Would you recommend it to others? This was a fun pattern to make. I love how the details you spend time on really make a difference in the look of the garment. I would (and probably will) definitely sew these again. They didn't take too long and look great. It took me about 7 hours from tracing to completion (a lot less time that I originally thought).

Conclusion: Fantastic pant and my son really likes them so they are a definite winner.

Thank you so much for stopping by! Have a great day.

Until next time...


Wednesday, August 12, 2009

Garments in My Sewing Queue!

While I have been sick I haven't been sewing but sickness certainly didn't stop me from thinking of sewing. I decided to go through my Ottobre and Burda mags and make a list of the garments that I wanted to sew up. As I was going through I limited myself to only picking patterns that I most likely have fabric now to use. This is the measly list that I came up with. Note: This list does not include Jalie or my big 4 patterns.

For my kids:

Ottobre 3/2004
#22 pants for my boys

Ottobre 1/2005
#29 high cross front shirt for daughter

Ottobre 1/2006
#37 eyelet cross over sleeveless blouse
#16 basic dressier pant for daughter

Ottobre 4/2006
#16 Star hooded fleece sweatshirt for son
#17 slim corduroy pant for son
#23 trench coat
#31 T-shirt with cross neckline for daughter
#32 hooded vest for daughter

Ottobre 5/2006
#33 belted jumper
#32 shirt with cute shirring on the sleeve

Ottobre 4/2007
#21 Jacket with shawl collar
#20 elastic waist a-line short corduroy skirt
#29 denim pant for boys
#34 hooded sweatshirt w/ front pocket for daughter
#32 velveteen pant/ jean--finished
#31 tunic w/belt--finished

Ottobre 4/2008
#26 raglan t-shirt for boys
#24 cool pants for outerwear fabric for son--finished
#35 shirtdress w/belt
#38 raglan t-shirt with hood for son

Ottobre 6/2008
#29 sweater with mock button up shirt for son--finished
#26 outerwear vest for son
#36 jacket w/sweater knit for daughter
#38 light outerwear jacket for daughter

Ottobre 1/2009
#22 raglan t-shirt w/contrast long sleeve and cuff for son
#18 t-shirt w/ contrast yoke, sleeve, and shirred front for daughter
#35 tunic with button front
#32 leggings
#24 polo shirt for son

Ottobre 3/2009
#33 flared t-shirt with criss-cross in back
#24 t-shirt for son with contrast cuff and stripe on shoulder
#27 t-shirt w/polo color for son
#19 jersey jacket w/gathered yoke

Burda 8/2009
#139 short plaid jacket
#141 dress
#145 cuffed skirt

For Me:

Ottobre 3/2004
#41 hooded fleece jacket

Ottobre 1/2005
#38 high cross neckline t-shirt
#40 quilted outerwear vest


Ottobre 2/2006
#3 collared pullover shirt
#18 sweater cardigan with tie
# 5 basic button up shirt (no pockets)
#1 v-neck t-shirt

Ottobre 5/2007

#10 jeans
#19 hooded sweatshirt

Ottobre 5/2008
#5 cargo pant
#13 jacket

Ottobre 2/2009
#1 cami

Burda 8/2008
#129 long blouse w/tucks at shoulder

Burda 2/2009
# 107 skirt
# 101 dress

Burda 5/2009
#103 wrap v-neck top
#112 shirt jacket w/zipper
#110 blouse

Burda 6/2007
#129 wrapped top dress

Burda 7/2009
# 122 wrapped top w/tie

Burda 8/2009
#104 ruffled blouse
#119 jacket w/interesting collar
#107 pleated skirt and buttons


Now I certainly don't expect that you did any more than skim through the above list. The only reason that I typed it out is to keep a list for myself. Also, I couldn't believe all the garments that I could make that I already had fabric for. Of course I already knew that I had a large fabric collection (that I don't feel guilty about) but making out this list really put my fabric collection into proper perspective. I guess I really don't need to buy any more fabric for a while. I think that I will keep very busy.

I am so glad now that I didn't do any clothes shopping for my children this year. Earlier this year I purchased some things for really good sales. My plan was to sew up anything they would need. I certainly have the resources.

What have I done so far? Tonight I traced a Ottobre shirt and a pair of pants for my daughter. Tomorrow I will hopefully get around to cutting them out and sewing up at least the shirt and maybe the muslin of the pants. Before I do any sewing though, I have to have my daughter try on all her clothes to see how much she really needs. No need for me to sew up more than she needs when I could be sewing for myself. :)

Wow, what a lot of rambling.

Just so this post isn't pictureless I leave you with a picture of my children climbing on this really neat rotating climbing wall. We went for the first time to Pump It Up, an indoor inflatable playground. They had as much fun on this wall as they did all the big blow up stuff.


Thanks for stopping by! Have a great day.

Until next time...

Update 8/13: My daughter tried on all her clothes. She has plenty! What is a sewing mom to do?! I am going to have to finish her first day of school outfit then sew for my son (who does need some things) and then for me. But I have so many cute things to make for her! I am heartbroken!

I have a question for you moms. Do your children outgrow their clothes because of their width or height? All of my kids outgrow things because of their height. Width wise my kids can wear clothes 3-4 sizes smaller than their height. For my daughter this means that all her shirt sleeves become 3/4 length and she can wear them another year or two. She has had a couple of things in her closet since 1st grade (she is going into 4th). My 7 year old son can wear a size 4 t-shirt or short but needs size 7-8 to be long enough for his arms and legs. How do your kids grow? Are mine weird or just normal?

Tuesday, August 11, 2009

Jalie 2804: A Spontaneous Creation


What a fun sewing weekend I had. My kids were gone camping with their grandparents and I spent Saturday finishing up my Burda blouse and made this one up Sunday afternoon. It has been a long time since I finished so many garments in such a short time. I should have been working on my daughters school clothes but I wanted to make one more thing for me.

Boy, this is a great shirt to just whip up in an afternoon. It was so easy. I think that I might have made it a little small. It could be because my fabric is too stable (it passed the stretch test but had to be pulled). I will still wear it but next time I will make a bigger size.

My full review:

Pattern Description: Empire crossover top with banded neckline and modesty panel. View A has a double layer lower bodice with gathered top layer. View B (one I made) has a flat single-layer bodice. Choice of cap, short, 3/4 or long sleeve. Sleeveless version has a casing at shoulder seam for adjustable casing.

Pattern Sizing: child 2-13 (F-Q) women's 4-22 (R-FF) I made size V tapering to Y at the hip. This is the same size that I made last time I made a Jalie pattern. I feel like it was a bit too small. I can wear it but I think a bit bigger would have been better. My measurements fit size V but I think I would like a bit more room. It could be that I needed to use a stretchier knit. The fabric I chose stretched the amount needed but I did have to pull it a bit.

Did it look like the photo/drawing on the pattern envelope once you were done sewing with it? Yes. Mine looked just like the picture.

Were the instructions easy to follow? The instructions were pretty easy. I did have to look at the pictures to get a better idea of what the instructions were saying.

What did you particularly like or dislike about the pattern? I liked how easy it was to put together. I made this shirt (from tracing to completion) in just a few hours. I like how the modesty panel extends across the whole front and isn't just a small v of fabric.

Fabric Used: Polyester knit from Joann's with quite a bit of recovery. It stretched the required amount but I had to pull it a little.

Pattern Alterations or any design changes you made: I didn't change the design at all. I did try to make the sleeves larger. I tried starting at the V size and tapering out to the y and then back in. this didn't work that well. I think that I would need to try something else next time.

I didn't attach the neckline as they did. I bound it with my coverstitch machine and binder attachment. I also did this on the modesty panel instead of turning elastic. I think that this made the seam in the armscye a bit bulkier. The bulk seems to cause a little pulling at the arm seam. I think I would try the elastic next time.

Would you sew it again? Would you recommend it to others? I will definitely try this again. My daughter wants me to make her one and I think I have enough fabric left.

Conclusion: This is a great staple. Once I get the fitting quirks worked out it might become a TNT pattern.


BTW, I LOVE my binder attachment. Belinda and Debbie Cook have shared so many garments with awesome binded edges. They use binder attachments and have such marvelous, professional results. I have been wanting a binder for quite some time but wasn't sewing enough knits to warrant spending the money. I decided to bite the bullet and get one because I knew that I was going to be making quite a few knit shirts for my children for school clothes. This was one of the best things I have purchased for sewing. It is so easy to use! I thought there would be a learning curve but for me it was fairly easy to use right away. One thing I have to figure out is how to stretch the binding a bit to get the neckline to hug the neck. I will just have to play around until I get it right.

Here are some links to Debbie Cook's coverstitch tutorials and also Belindas coverstitch tutorials. Their information is fantastic!

Thank you so much for stoppin' by. Have a great day!

Monday, August 10, 2009

I Just Want to Sew!

My kids are home. My youngest son is sick. I don't feel so well. The house needs to be cleaned.

BUT, all I want to do is hole up in my sewing room and sew, sew, sew!

Oh, the tortured life of a seamstress!

Until next time...

Sunday, August 9, 2009

Burda 8-2008-103 Blouse Finally Finished!


This project, while enjoyable took a bit of time. Not something I could just whip out in a day. I really like the fabric I used. It is something totally different than I have sewn with before. I have always steered clear of slippery fabric. Sewing with polyester silky was not as difficult as I thought it would be. Cutting it out had its challenges. I started cutting the pieces out with two layers. My front peplum pieces came out very different so I changed to cutting out single layer. This worked much better.

My full review:

Pattern Description: This blouse sports a peplum and short, puffed sleeves as well as true-to-style self-fabric button loops and pretty little buttons.

Pattern Sizing: 34-42 I made size 42.

Did it look like the photo/drawing on the pattern envelope once you were done sewing with it? My garment looked very much like the picture.

Were the instructions easy to follow? They were pretty easy to follow. This shirt doesn't really have any complicated design features. Even though the instructions are typical of Burda (not much extra info) they are clear enough if you have made shirts before.

What did you particularly like or dislike about the pattern?I liked how the neckline was finished. The binding finishes off nice and cleanly with the facings. I also really like the button underflap application. I have made other patterns with button loops that didn't include this. This just shows how much attention to detail there is in Burda patterns.

Fabric Used: Silky Polyester from Fabric Depot in Portland, OR. This was my first time to use this type of fabric. I tested different seaming methods to minimize puckering. Sandra Betzina, in More Fabric Savvy, suggested french seams for this type of fabric. This didn't work very well for me. I had very good luck with serging.

Pattern Alterations or any design changes you made: I added 1/2" to the length so the shirt was a little longer. Other than this very minor adjustment I made the pattern as drafted and written.

Would you sew it again? Would you recommend it to others? I probably wouldn't sew this again because it is distinct. I would definitely recommend this to others. It was easy and fun to sew.

Conclusion: This was a great shirt to make. It has great style without being too complicated to construct. A very rewarding project.

Thank you so much for stopping by! Have a great day.

Until next time...


Wednesday, August 5, 2009

Road Trip: Black Hills, South Dakota Part 2

The Black Hills in South Dakota were so beautiful. I was glad that we were able to explore them for a couple of days. I found out that the Black Hills (which look very green when you are in them) were named because they look black from a distance. Interesting, I thought.


The other interesting thing we saw was all the little piles of wood and brush. They were everywhere. Finally we found out that all the piles were made to clean up downed trees and brush that are potential fire hazards. Then in the winter they would burn up the piles.

Here is a list of the other fun things we did while in the Black Hills.

1. Custer State Park--We would have liked to camp at one of the campgrounds in Custer State Park but we froze the night before (it got down in the upper 30's) so we didn't. While in Custer State park we drove the Needles Highway (SD 87) and it was AMAZING (well, my kids didn't think it was quite as fun as I did). The rock formations were fascinating.

Notice my children at the bottom of this picture of the Needles Eye for size reference.
There were some really neat tunnels that we got to drive through. At this tunnel we got out and climbed around on the rocks a bit. It was so much fun to explore the nooks and crannies of these rocks.

The highway is not many miles but it takes a while to drive. It is very twisty and curvy and very beautiful. There is something gorgeous to look at around every corner.

We also drove on the Wildlife Loop Road. This drive was more on the plains but still interesting. While driving on the road we saw a few buffalo but not as many as I wanted to see and they were quite far off. We kept hearing how plentiful the buffalo were and I really wanted to see some. We also came across a donkey at the side of the road. He was quite cute.

As we were leaving the park I finally got to see a LOT of buffalo. There was tons of them and they ran right across the road in front of our car. It was GREAT!


After all of the buffalo passed us we kept driving and were able to see the exact path they took. It was really cool to see the trodden ground. Such little things can fascinate me.

2. Highway 16A--We drove this road up to Keystone. There is some awesome tunnels on this road. I love tunnels. They are so much fun. I loved that these tunnels were one lane so there was some element of danger. One tunnel framed Mt. Rushmore. Much to my husbands dismay (he got pretty exhausted driving on all the curvy roads) we drove this road a few times because I loved going through the tunnels. He is so wonderful to put up with my craziness.

We ate dinner at a new sandwich place in Keystone and then we drove on to Rapid City. I know that Rapid City isn't technically in the Black Hills but I am going to add the stuff we did in Rapid City to this post.

3. Storybook Island--In Rapid City, SD. My kids loved this stop. They really appreciated being able to run and play after a long day of driving. Storybook Island is a large playground with all the things to play on based on storybook characters.


I was amazed at all the fun details in this park and it was free (you could give a donation). My kids could have played here all day.

4. Thunderhead Falls--10 miles west of Rapid City, SD. We were told in Keystone that this was something we shouldn't miss. The area getting to and around Thunderhead Falls is beautiful. Thunderhead Falls is a pretty tall waterfall that is inside a cave. The cave was fun to walk through. We saw some interesting mining remains and how different minerals showed up as different colors in the rock. The actual falls weren't that fantastic. We could really only see the last 10-15 feet of the waterfall. The noise of the falls inside the cave was kind of fun. So, this is one attraction that had its good points but we could have missed it.

5. Chapel in the Hills--In Rapid City, SD. This stop was an afterthought. We passed the sign for it on the way to Thunderhead Falls. The picture on the sign looked fascinating so I thought we should check it out.The chapel itself is an exact reproduction of the famous Borgund Stavkirke of Laerdal, Norway. The architecture was gorgeous! It was beautiful inside and out. They actually have services in the chapel. Unfortunately, we weren't there at the right time. They also have a small museum showcasing items brought over from Norway or made by Norwegians here in the 1800's.

Boy, we sure were busy on our trip. I think that I have blocked some of the craziness out. My next Road Trip post will bring you more things we saw in South Dakota.

Thank you so much for stopping by. Have a great day!

Until next time...

Tuesday, August 4, 2009

Simple Silk Screening

I have been wanting to do silk screening for a while. I almost purchased some stuff to do it while I was at the Sewing Expo in March. I didn't buy anything then because I didn't want another project to figure out. I think that the Yudo machine that came out is really neat but I am not going to pay over $200 for something that I am pretty sure I will not do all the time.

Just the other day the Crafty Crow linked to an awesome easy silk screening idea on One Golden Apple. I can't wait to try it out. She made it look so simple. These are some cute t-shirts that the Golden Apple showed on her post. I think that I might even try this with my kids. My daughter is having a friend over to celebrate her birthday and this might be a fun thing to do.


Now I just need to find the supplies. Good luck to me!

Thanks for stopping by! Have a great day.

Until next time...

Monday, August 3, 2009

Road Trip: Black Hills, South Dakota Part 1

This was one of my favorite parts of the trip. This also began the tenting portion of our adventure. After we drove for a few hours we camped for the night in Lusk, Wyoming. This was our best tenting night even though we were at a "campground" sandwiched in between the highway and railroad tracks. We stopped early enough to set up the tend in the light and when we woke up the sun had warmed up the tent. Little did we know what was to come or we would have enjoyed that nights sleep much more.


Now on to South Dakota. I really knew nothing about this area before planning this trip. Sure I had heard about it but that was about it. I just knew that I really wanted to see Mt. Rushmore since we were going to be in the area. This area was so beautiful and fascinating!

Our first stop was Jewel Caves outside of Custer. All I can say is WOW!! We were able to take a 1 hour and 20 minute Scenic Tour of the cave. It was amazing! My children loved it. They have constructed a path for the entire tour. You walked on either raised metal pathways with railings or on what looked like cement walkways. There were lots of stairs but I didn't mind since the surroundings were so fascinating. After the tour the kids got a junior ranger book to fill out. They learned a lot about the caves doing these books and really took ownership of their adventure. After they finished they were "sworn in" to become junior rangers and were given a badge. This was an awesome experience that none of us will ever forget.

The picture was taken from here since I didn't take any pictures while touring the cave.


When we went in to the caves it was nice and sunny. When we came out it was pouring buckets of rain. The day was full of surprises. After Jewel Caves we stopped for a bit in Custer, SD. It was a small, cute little town. We ate lunch at a brand new bistro that had awesome pie.

Then we were off to Mt. Rushmore hoping it wasn't raining there. I was so excited and I was surely not disappointed! I was in awe from the first spotting of the face of the mountain driving by.


I wasn't expecting the huge parking garage when we drove in. It was shocking. We went up the stairs out of the garage to see this...I don't know what it was about this memorial but I was in awe from the very moment we stepped in. I loved every minute. I thought it just got more and more impressive as we went along the path through the Avenue of the flags and got up close to the mountain at the Grand View Terrace. Thankfully it had stopped raining. You can see the rain on the faces. It almost looked as if they were crying.


My kids picked up a junior ranger book here also. It had a lot of fun activities to do while at the memorial. One of the activities was a bingo board with lots of different facts they were to find out. We went on a ranger talk to learn about the mountain. My kids were fascinated by all that the ranger had to say. They learned a ton about the artist and the 4 presidents. They could still tell you who Gutzon Borglum was and possibly which president had the Panama Canal constructed. What an educational experience!


Down the elevator, under the Grand View Terrace, was the LincolnBorglum Visitors Center. There was so much to see and learn. My children loved the exhibit where they could push buttons and watch the mountain blow up on the tv. Oh, so easily entertained. They were "sworn in" again here to become junior rangers at this park and picked up another badge. They were lovin' it!


We spent about 3 hours the first day and then went back again the next day to see the Dakota, Lakota, Nakota village and spent a couple more hours looking around. I was sad to have to go. I thoroughly enjoyed this visit and would like to go back someday.

Thank you so much for stopping by. Have a great day!

Stay tuned for more travel in South Dakota and some crafting coming up soon.

Until next time...