Friday, January 30, 2009

Camo Day

This past week has been Spirit Week at my kids school. Tuesday was Camo and Pink day. My kids didn't have anything camo so on Monday evening I decided to make them something. I wanted to use my Ottobre 301 t-shirt pattern and just needed some fabric. My youngest son and I headed to JoAnns for some knit camo fabric. I really wanted some pink camo for my daughter. That would have just been so perfect. I went in hopeful to find what I needed. I searched and searched but was having trouble finding what I wanted. I thought I was going to have to settle for fleece. Of course, there was not any pink camo. As a last effort, we headed to the clearance section and my son spotted some camo fabric that was perfect. So, that evening I spent making two shirts. My kids loved them!

I used my Ottobre t-shirt pattern for the first time. It was a wonderful pattern. It fit my kids beautifully. I am amazed at the accuracy of the measurements in Ottobre patterns. I am so impressed with Ottobre I don't think that I can go back to patterns from the big 4. I would much rather spend time making something that I know will fit my children rather than hoping for the best (which is what I do with big 4 patterns). I am so bummed that I didn't start using these patterns sooner (I have had a magazine for a couple of years am just now using it). Well, now I will just move forward with these great patterns.

Here is my review:

Pattern Description: Unisex long sleeve t-shirt either straight or more fitted cut

Pattern Sizing: 92-170 I made size 110 for my son with size 128 length for his long arms. I made a size 122 width and 140 length (146 arm length) for my daughter.

Did it look like the photo/drawing on the pattern envelope once you were done sewing with it? Yes

Were the instructions easy to follow? Yes the instructions were very clear.

What did you particularly like or dislike about the pattern? I like the instructions for putting on the binding and putting the sleeves flat and then seaming the sleeve and side seam at one time.

Fabric Used: very stable knit without a whole lot of stretch

Pattern Alterations or any design changes you made: I didn't make any alterations

Would you sew it again? Would you recommend it to others? Absolutely! I am sure I will make this many, many times in the future.

Conclusion: The finished garments fit my children exactly. I love how accurate the pattern size is to the measurements given. This is one of the best t-shirt patterns I have ever tried!


I used my coverstitch machine for the ribbing and it worked wonderfully. I still have quite a bit of practicing to do to get my hems and ribbing close to perfect but even as unperfect as they are I still think they look great. I love this machine.

Thanks for stopping by. Have a great day!

Until next time (hopefully soon, I have a lot to show you)...

Friday, January 23, 2009

Facelift Again!

As you know from my constantly changing blog that I have never been happy with how it looks. Well, Melissa posted about a great place to get fun and FREE backgrounds. So, I played around with it for a bit (I am supposed to be sewing) and came up with something that I think I actually like and might stick with for a while. There are so many fun ones so don't be surprised if this blog looks different next week. :)

There is a button you can click on in the upper left hand corner that will take you to the Cutest Blog on The Block site and you can find your own super cute background. Such fun!

Thanks for stoppin by. Have a great day!

Until next time...

Monday, January 19, 2009

Alaska Quilt Block #2

I would have posted this a couple of days ago but I have been having computer trouble. But now I will post block #2 and hopefully I will get it done before my computer crashes again.

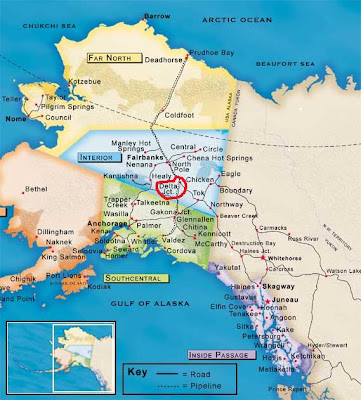
This block is from The Calico Cow in Delta Junction, Alaska. To give you an idea of how far Delta is from me it takes about 6 hours to drive there (330 miles).
My grandparents picked this one up for me as they traveled out of Alaska back to Texas. When I first saw the fabrics I was unimpressed. I thought they were boring. Even as I was making this block I didn't think I would like the finished product. To me, it seemed boring. When it was all finished I was pleasantly surprised. I like the simplicity. The simple fabrics help to enhance the star in the middle. It will never cease to amaze me how you never really know how something will look until it is all finished.
Thanks so much for stopping by! Have a great day.

Until next time...

Tuesday, January 13, 2009

My Sewing and Knitting Backstory

I have been reading the histories of many fantastic seamstresses in blogland. So many started when the were very young. My sewing and knitting history is long and short at the same time.

I grew up in a fabric store. No, not really but I was there with my mother very often. None of the fabric stores are still in the same place and most are not around anymore but I can clearly picture them in my head due to frequent visitations. My mother sewed beautifully all my life (she started in junior high). She saved the first baby dress she ever made me. She made many, many special dresses for me as I grew up. She would ask me periodically if I wanted to learn to sew but it was never an interest to me when I was young. I was way too busy doing other things. I did take home ec in junior high but had a horrible teacher. My mother couldn't believe the ways she would tell me to construct this one garment I tried to make. This experience really turned me off from taking the time to learn to sew.

Then comes Christmas of 2000. My mother got a new fancy dancy embroidery machine for Christmas. Since she had no need for her old machine she GAVE IT TO ME! I was now very excited to learn. I was 26 and my first child, a daughter, was only 4 months old. I really wanted to learn how to make my daughter cute things. My mom started me out guiding me through my very first garment, a really cute pair of overalls. I was hooked. My mom was a great teacher but I decided that I wanted to have focused time to learn. With my mom learning would be hit and miss whenever we would be able to get the time together. I decided to find a sewing class. I found a wonderful teacher and for a year went every week for 2 hours to learn how to sew. She taught me so much. I really appreciated how she taught me to think outside the box and gave me confidence to not have to follow the pattern guide sheet. She let me make whatever I wanted and guided me through giving me many tips along the way. The garment I will never forget was a pair of real overalls made with purple twill complete with lots of topstitching. By the time I finished them I hated them so much I think I only had my daughter wear them once.

During the summer of 2001 I think sweaters with everything must have been in. I was seeing cute sweaters everywhere and I decided I wanted to learn to make them myself. I contacted a knitting teacher and my mom and I sat a couple of Saturdays on this lady's couch while she taught us to cast on, knit, pearl, increase, and decrease. This was my only knitting instruction. Most of knitting I have taught myself (well, actually, I go to my knitting guru friend all the time with questions).

After the year of sewing classes my husband said that I had learned enough and said I couldn't go back to the classes. They were too expensive. He has no idea how much there is to learn with sewing. Since then I have been learning on my own and stretching myself to get better and do more complicated things. Twice I have gone with my mom to the Sewing and Stitchery Expo (2006 and 2007) and learned a ton of fantastic tips and tricks. The second year I picked up smocking. We are going to go again this year and I am so excited to learn some more. I only really discovered sewing blogs and pattern review (I actually signed up for PR in 2003 but forgot about it and never went to the site) about a year and a half ago. Wow! What a wealth of inspiration and motivation. I have loved this resource and has helped me grow tremendously as a seamstress and a knitter.

So as you can see sewing has always been a part of my life but I only have been doing it myself for the past 8 years. Boy, have I come a long way! I can't wait to see what the next 8 years will hold.

Thanks for stopping by and reading a bit of my history. Have a great day!

Until next time...

Sunday, January 11, 2009

A Dress for a Wedding

In the past I have read about many people who have had a wedding to go to and therefore made a dress. Before reading these blogs the thought wouldn't have crossed my mind to make a dress for a wedding. Plus, I don't go to too many weddings. Most of the people I know are already married. Well, recently a co-worker of my husband got married and I made a dress for the wedding!

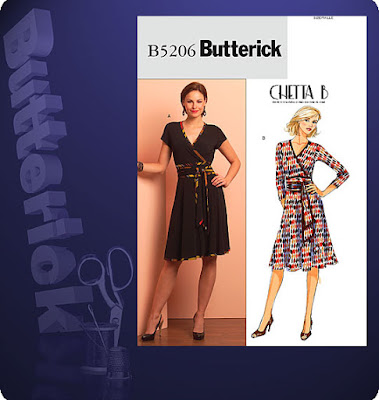
This was a huge step for me. I have never made a dress for myself. Shirt, yes. Dress, no. I used a fairly easy pattern. Butterick 5206.
I read the reviews on Pattern Review and was pleased to find out that most really liked the pattern and the finished results. I think they all said that they had to take in a few inches and this really helped me decide what size to make. My pattern only went up to a 14. This was fine for my bust but too small for my waist and hips. After reading the reviews I felt confident that I could just cut a 14. I did add an inch to the back after measuring the back bodice piece because I have a wide back. I also added a bit to the neckline because all the reviewers felt the neckline was quite low.

The pictures aren't the greatest. They were taken inside at night and there is quite a bit of shadow. I tried to lighten them up a bit so you can get an idea of how it looks.I have to say that this is the boldest print I have ever worn over my whole body. I cannot believe I made it for myself. It is very daring but I kind of like it though.

Pattern Description: Mid knee length dress has close-fitting mock wrap bodice, flared skirt, contrast binding, side zipper, two sleeve lengths and tie belt.

Pattern Sizing: 8-14 I measure 14-16 in the bust and 16-18 in the waist and hips. Since I had read other reviewers had to take the dress in about an inch or so I decided to cut out a 14. This worked great for me. I did add an inch (total-half inch to each side) to the bodice back because I have a wide back and after measuring the actual back bodice piece I realized that was needed.

Did it look like the photo/drawing on the pattern envelope once you were done sewing with it? Yes very much like the picture.

Were the instructions easy to follow?Very easy to follow although I didn't really use them too much since it was easy and I wanted to do things a little differently. I but the top together before doing the binding on the top. I wanted to make sure the top fit well before going through all the trouble of binding the edge. I also set the sleeve in flat rather than per the instructions.

What did you particularly like or dislike about the pattern? I liked the simplicity of the pattern and the result didn't look simple. I think that I must not have attached the waist very well because it looks messy. This is completely unnoticeable under the belt.

Fabric Used: probably a polyester knit from Michael Levine Loft

Pattern Alterations or any design changes you made:
1)I didn't have quite enough fabric so my ties were not as long as the picture.
2) I did the binding a bit differently. I cut it on the crossgrain because this direction had a comparable amount of stretch as my fashion fabric. I stitched the binding on the garment right sides together. Then I folded the binding over the seam allowance to the other side and stitched it down using my coverstitch machine. This gave a nice finish to the wrong side. Since my fabric was black you can barely see the stitches on the wrong side of the tie. This was a very easy application of the binding. I would have rather used a binding attachment for my machine and done the whole thing in one step but since I don't have a binding attachment yet I had to do it in two steps.
3)Eliminated the zipper per recommendation from other reviewers. It slips over the head just fine.
4)Bound the arm and hem. It was easier to bind these edges instead of trying to turn and stitch them down.

Would you sew it again? Would you recommend it to others? I am not sure. I love the dress and love how it looks but I am not sure that you can have many of this style in one closet. I might make it in a solid. I think that would look different enough from the print.

Conclusion: I would definitely recommend this pattern. It was easy to sew and to fit. This is a great first dress and a nice beginning pattern for sewing knits. I really like the belt as it covers a multitude of mistakes.


I took pictures of putting on the binding but since it is black it is just too dark. You can't see anything so there is no point on having pictures. Sorry about that.

If you are looking to make an easy dress that is quite nice give this pattern a try. I think it is a great knit dress. Oh, I think that it is a bit low too. I have it pinned but I think next time I might wear a tank underneath.

Thanks for stopping by! Have a great day.

Until next time...

Saturday, January 10, 2009

Alaska Quilt Block #1

Twelve days ago I made the commitment to make one quilt block a week. You are probably think that I already messed up. Well, I didn't really. I didn't get the Thangles (which is necessary to making the blocks) until last Saturday. Since it has only been a week since I had all the supplies I am right in my time frame.

Let me tell you about Thangles first. They are quite interesting. Since my blocks are 2 1/2" finished I will used these measurements. You start with 3" strips. Then you pin on the Thangles 2.5" strips. The strips are 3"wide paper strips that have triangle lines marked.

As you can see in the picture there are multiple diagonal lines. The middle one is solid and the two on either side are dotted. You stitch on the dotted lines. This one strip will make 4 triangles. This is a picture of the backside and you can see the stitched lines.

To make the triangles you cut on the solid lines.

Last you take off the paper and you have a very nice square.

Sorry I don't have a picture of one finished square. I do have a picture of my finished block. This block kit came from Seams Like Home here in Anchorage. It was pretty easy to get. :)

Thank you so much for stopping by! Have a great Sunday.

Until next time...

Sunday, January 4, 2009

To Go Cheap or Not to Go Cheap? That is the Question.

I rediscovered an Ottobre yahoo group recently that I subscribed to long ago. All of the messages were going to my yahoo mail that I never check and boy have I been missing out. I set it to go to my regular email and now I will be able to keep up. This is not the reason for this post though.

One member of this group posed a question to the others. She wanted to know an average price for making different garments and if it was possible to sew for less than you can purchase clothing a stores such as Target or Children's Place. The discussion got quite interesting with people sharing why they sew and what quality fabric they use. Some members sew to save money and strive to make garments for the least amount of money possible. Other members bought the fabrics they loved regardless of price because they wanted to make one of a kind outfits. There was also many responses in between.

I thought this was a very timely question. Something I have been pondering lately. When I began sewing 8 years ago I couldn't wait for JoAnn's 50% off clearance fabric sales. I loved getting fabric for $2 and $3 a yard or even less. I could make outfits so cheaply. I did quite a bit of sewing with this type of fabric. I didn't even go to the independent fabric store because I couldn't imagine paying those prices.

After a while I started going in to our local fabric stores and would find fabrics I really liked that were on sale. I bought a few cottons for $5 and $6 a yard. Thus began my love for high quality cotton fabric. I noticed immediately how nicely it sewed up. It would press beautifully. It didn't come out of the dryer a wrinkled mess.

Then I decided to make a wool skirt for myself. I wanted nice fabric so I went to my local store and purchased some nice wool. It was a delight to sew and I loved the result. My love for nice fabric was just beginning. I still couldn't bring myself to pay a lot for fabric on a regular basis so I worked on finding good deals when I could. I would go to Denver Fabrics Annex when I could. I stocked up on some nice fabrics when I went to the Sewing Expo in Washington and found some for good prices. I would get cottons twice a year when the quilt stores had their sale day or get it from their clearance bin. All the while I continued getting cheaper stuff also.

Now in my stash I have an assortment of a few nice fabrics, some decent fabrics, and quite a few cheap fabric choices. Every time I sew with my cheaper stuff I have great difficulty. It just doesn't sew up as well. It doesn't make sewing fun for me. It just becomes frustrating and the results are often not exactly what I would like. Take for instance the three polka dot dresses I just made. I purchased the fabric from JoAnn's. It wasn't clearance fabric. It was their regular stuff for about $6 a yard which I got on sale. This was fairly decent fabric. It sewed up alright but when I finished they just didn't have the crisp look I was going for. It just seemed like the fabric was never completely pressed. While these dresses are cute I wish I would have purchased nicer fabric. I would have gotten the result I really wanted.

I just made two garments from fabric I purchased at the Denver Fabrics Annex and from Michael Levine's Loft-nice fabric at less expensive prices. I was very pleased with how both sewed up. One of the garments was a knit. My knit experiences to this point have been less than great. Recently I made a knit shirt for my daughter. The shirt material was from Michael Levine's Loft and it was fairly nice to work with. It needed contrast and binding fabric and so I purchased some from Joann's. I had great difficulty with this fabric but it just might have been because it didn't have as much stretch as I needed. With the garment I just made I also needed fabric for binding. This time I got it from my local store. It was a little more expensive but it was a joy to work with.

So, through this fabric journey I have learned a few things. Sewing is much more fun when I use nice fabric. Nice fabric might cost a bit more but in the long run it is worth the extra expense. I am happier with the result and am more likely to wear (or encourage my daughter to wear) the garments that I make. Using nice fabric just makes sewing more fun.

As a result of this ponderings I have made it one of my goals to purchase more quality fabrics for my stash this year. Now, I still have a very frugal side so this will be a challenge but one I think I am up for. It is just going to take some savvy shopping.

In answer to the question on the Ottobre group how much I spend on fabric. I guess that would depend on the project. I might try not to spend very much on something that I know is not going to last long (like shorts for my children for a short Alaskan summer). But, I will not skimp on something I want to last a while. I have to remember that the garments I make could not be purchased at cheaper clothing stores. They would be found at the more expensive botiques. So if I spend $20-$25 (I usually spend lots less on nice stuff) on fabric for an outfit I am saving a lot of money compared to the expensive stores where I would like to purchase clothing.

I know that many of you already have come to these conclusions about purchasing nicer fabric. This has been a process for me. Actually this is kind of funny because I figured this out a long time ago with purchasing yarn for knitting. I simply cannot bring myself to purchase cheap yarn. I figure that if I am going to put hours and hours into something I am going to use the good stuff.

Wow! This is a long post. I will leave you with a picture of a typical activity at my house. Thank you so much for reading. Have a great day!


Until next time...