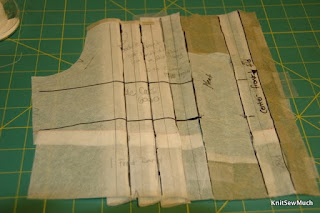
Note: You can see the white line a few inches up from the bottom. That is where I sewed the front band to the bodice piece to make a full bodice piece. McCalls 6020 had two separate pieces and I wanted only one. This had to be done before I began the pleating.
My pictures were taken after I already used this pattern so you will have to excuse the folds underneath.
Let's begin.
1) This is my original pattern piece. The center front fold is on the right. I drew 4 lines parallel to the center front. These lines are 1" apart. I want the box pleats to be 1" wide and to touch each other so 1" is the spacing that I need to make this happen.

2) I added 1" to the center front. When I cut this out I will now place the edge of the added piece on the fold. This will be my center pleat. When the pleat is made the original center front will still be the center front of my dress. For this pleat I only add 1" because it is on the fold. I am actually adding 2" (1" on each side of the fold) which is the width I need for a 1" pleat.

3) I drew horizontal lines so that I would be able to keep my pattern lined up correctly. I can see through my pattern paper to the grid lines on my board. The center front should be lined up on a vertical line. The two horizontal lines are perpendicular to the center front.
On a pattern without a center front to line up you can always use the grainline.
4) Cut along the first line. Carefully move your piece over 2" keeping the horizontal lines following the same line on the board. Add in paper to fill in the empty space. This is my first pleat (When made into a pleat all that is added will be removed).

5) Make all the other pleats in the same manner cutting on the subsequent lines. Here is my pattern piece with all the pleats added.

For the skirt back I didn't need to add any for the pleats. I just turned the gathers into pleats. I measured and drew lines so that my pleats on the skirt would match the pleats on the bodice. Here is a picture showing where I drew the pleats.

Well, I hope that this tutorial helps clarify how to add your own pleats. It is really easy to do. In the next post I will show how I prepared my fabric.
Thanks for stopping by! Have a great day.
Until next time...


Very clear and great pictures. Thanks!
ReplyDeleteTerrific photos and instructions. Thank you.
ReplyDeleteThis is a great tutorial, I'll be linking to it on my blog. I've been wanting to add pleats to a simple skirt pattern. Is it safe to assume that the technique for a skirt would be the same?
ReplyDeleteI've been looking for something like this for a couple months now. Thank you so much!! You have just saved my sanity.
ReplyDeleteAn even easier way is to first pleat the fabric, then you just place the pattern on top and cut it out 😊 this way you can easily make diagonal pleats, which is harder to do on a paper pattern
ReplyDelete