Wednesday, April 28, 2010

Ottobre 01-2005-22 T-shirts For My Boys


My boys have been wanting me to make them something and I have tons of high-tec knits in my stash so I decided to make them some long sleeve t-shirts. Of course I headed straight to my Ottobre mags to find just the right shirt. This was a great t-shirt. It was very easy to sew up and my boys love the fit. I ended up making 3 (the other one is black with grey contrast) and my son who is in the pictures wants more. I think I am done with this shirt for now. Some short sleeve shirts are in order now. Summer is coming and it might be warm enough to wear them. :)

Pattern Description: Long sleeve t-shirt with shoulder yokes cut from different fabric. Bound neckline and contrast cuffs.

Pattern Sizing: 104-128
Did it look like the photo/drawing on the pattern envelope once you were done sewing with it? Yes, my garments looked like the picture.
Were the instructions easy to follow? I found the instructions were pretty easy to follow. I did have to make sure that I marked the shoulder line. More of the contrast goes to the front than to to back. The first shirt I made I attached the shoulder incorrectly. I put more of the contrast in back. For the other shirts I made sure I marked the shoulder line well.
What did you particularly like or dislike about the pattern? It was a great pattern. It went together pretty well. I didn't understand why they put in a zipper. I didn't put one in my shirts.

Fabric Used: high-tech knit from Rose City TextilesPattern alterations or any design changes you made: I removed the zipper. I also used contrast knit fabric for the shoulder yoke instead of the woven the pattern called for.

Would you sew it again? Would you recommend it to others? DEFINITELY! My youngest son has asked for another one.
Conclusion: Great t-shirt pattern. I like the interesting detail on the shoulders. The shirt sewed up very quickly.

Just thought I would leave you with two more pictures. This shows what Alaskan kids do on the first nice day that comes along after a long winter. It is sunny, 45-50 degrees outside, there is still snow on the ground and my kids are having a water balloon fight. My kids are so anxious for summer. Can't you tell. :)

Thank you for stopping by. Have a great day!

Until next time...


Saturday, April 24, 2010

Tutorial: Adding Pleats-Sewing the Pleats

Wow! I can't believe it has been so long. Sorry for the wait for part 3. It has been a busy week (or 2).

On to the tutorial!

1. Fold the pleat in half so that the clips match up.

2. Sew right down the line that you marked for the pleat.
This picture shows 3 pleats that have been stitched along the lines.
3. Keep pleat folded in half and put a pin in right on the fold.

4. Opening up pleat place pin against seam line. This forms the box pleat. Half of the pleat is on each side of the pin.

5. Baste pleats down inside the seam allowance.

6. Iron pleats down.

It should look like this picture when the 3 pleats are finished (I apologize if the pictures are a little difficult to see). The red line is the center front.

Well, that is how it's done. I hope you were able to follow my process.

Thank you for stopping by. Have a great day!

Until next time...

Saturday, April 10, 2010

Tutorial: Adding Pleats-Preparing the Fabric

This is part 2 of a 3 part series on adding box pleats to a garment that was originally drafted without. To see the dress I pleated click here. For part 1 about preparing the pattern click here.

On to part 2--Preparing the fabric

Once your pattern is completed you are ready to cut out your fabric.

On my project I wanted a box pleat right in the center of the dress so I added 1" to the center front of my pattern (right side). The picture below shows my new pattern placed on the fabric. Notice that the CF is not on the fold anymore. I added 2" total to the CF but when I stitch the pleat the excess will be taken out and the original CF will again be the actual CF of the dress. When the pleat is finished I will have 1/2 of the pleat on each side of CF.


After you cut out your pattern make clips at the top and bottom edge of each pleat. The red marks on my pattern shows where I clipped. When you clip make the clips big enough to find them but not enough to go past your seam allowance. In this garment my seam allowance was 5/8" so my clips were about 1/4''.


The next step is to draw your pleat lines. Draw with chalk (not marker) from the clip at the top to the clip at the bottom of each pleat. Note: I wanted my box pleats on the outside of my garment so I drew my lines on the right side of the fabric. If you want your box pleats on the inside of the garment draw you pleats on the wrong side of the fabric.


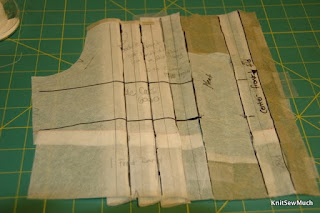
This picture shows my bodice piece with all the lines drawn in. The wider sections are the pleats.


The red line on the left side is my center front. The black lines on either side (actual center front from pattern piece) will be stitched together and the red line will be at the center of the box pleat. I will show how the pleats are stitched together in the next post.

To prepare the fabric for the skirt all I did was make clips at the top of each pleat because the skirt will not be pleated all the way down.

I hope that this was helpful. Please ask if you have any questions and I will try to clear them up. Stay tuned for part 3 coming soon.

Thanks for stopping by. Have a great day!

Until next time...

Thursday, April 8, 2010

Tutorial: Adding Pleats-Preparing the Pattern

As I promised here is part one of a tutorial on adding pleats to a garment. I am going to use my bodice pattern that I used for my daughters dress. You can use any pattern that you want. The method will be the same.

Note: You can see the white line a few inches up from the bottom. That is where I sewed the front band to the bodice piece to make a full bodice piece. McCalls 6020 had two separate pieces and I wanted only one. This had to be done before I began the pleating.

My pictures were taken after I already used this pattern so you will have to excuse the folds underneath.

Let's begin.

1) This is my original pattern piece. The center front fold is on the right. I drew 4 lines parallel to the center front. These lines are 1" apart. I want the box pleats to be 1" wide and to touch each other so 1" is the spacing that I need to make this happen.

2) I added 1" to the center front. When I cut this out I will now place the edge of the added piece on the fold. This will be my center pleat. When the pleat is made the original center front will still be the center front of my dress. For this pleat I only add 1" because it is on the fold. I am actually adding 2" (1" on each side of the fold) which is the width I need for a 1" pleat.


3) I drew horizontal lines so that I would be able to keep my pattern lined up correctly. I can see through my pattern paper to the grid lines on my board. The center front should be lined up on a vertical line. The two horizontal lines are perpendicular to the center front.

On a pattern without a center front to line up you can always use the grainline.

4) Cut along the first line. Carefully move your piece over 2" keeping the horizontal lines following the same line on the board. Add in paper to fill in the empty space. This is my first pleat (When made into a pleat all that is added will be removed).


5) Make all the other pleats in the same manner cutting on the subsequent lines. Here is my pattern piece with all the pleats added.


For the skirt back I didn't need to add any for the pleats. I just turned the gathers into pleats. I measured and drew lines so that my pleats on the skirt would match the pleats on the bodice. Here is a picture showing where I drew the pleats.


Well, I hope that this tutorial helps clarify how to add your own pleats. It is really easy to do. In the next post I will show how I prepared my fabric.

Thanks for stopping by! Have a great day.

Until next time...

Monday, April 5, 2010

An Easter Dress for My Daughter: McCalls 6020

Every year I try to make my daughter a dress for Easter. It hasn't always happened but this year I was determined to make her one. She needed a new dress (actually she needs a few) and I have so much fabric that it was a no brainer to make one instead of buy one. A month or so the Hanna Anderson catalog came in the mail and this dress immediately caught my eye. I loved the pleated bodice. It wasn't very expensive but since I knew I had fabric I decided to recreate this dress for my daughter.
So, I set out to find a pattern that I could use as a base to work with. I found McCalls 6020Front of my altered dress
Back

Side rant: One of my pet peeves with patterns is how sleeves always look smooth but are really gathered. Why do they always make gathered sleeves anyway! Smooth set in sleeves usually look better. How often do you see a RTW shirt with gathered sleeves? Usually not, but they expect us to always construct home sewn ones that way. I am usually able to ease in about an inch of extra fabric but they often put in many extra inches. I really need to learn how to draft my own sleeves to fit armholes. Or I just need to learn how to take the extra ease out of my sleeves. If anyone knows a good book or tutorial I would really be interested.

Okay, I am done with my little rant now on with my review.

Pattern Description: Below mid-knee length dress with front band, gathered skirt, tulle ruffle on lining, back zipper and ribbon sash or tie ends. Sleeve options: sleeveless or gathered sleeves.

Pattern Sizing: 3-14 I made my daughter a size 8 but lengthened to a size 10. She measures a little less than size 8. The 8 fit her quite nicely.

Did it look like the photo/drawing on the pattern envelope once you were done sewing with it? If I had made it they way they drafted it would have looked like the envelope. I changed my version quite a bit.

Were the instructions easy to follow? I didn't use them too much. I did like their instructions for lining the bodice and sleeve construction.

What did you particularly like or dislike about the pattern? I picked this one for the square neckline.
Fabric Used: cotton with a little bit of stretch. The stretch wasn't necessary. A regular cotton would work great.

Pattern alterations or any design changes you made: Obviously I changed quite a bit and I hope you can follow my progress.

BODICE1) I traced the front band and the bodice front on to sewable tracing paper. Then I sewed these two pieces together to make one whole bodice front. This new bodice front is what I will use to do the rest of my alterations.

2) I cut off the "straps" and added 1/4" seam allowance to the "strap" and the bodice where the "strap" would be sewed back on after bodice is pleated.

3) Now for the pleating. I wanted 1" box pleats covering the front. I had to add 2" for each pleat. First I drew 4 (I wanted 4 pleats on each side of the center pleat) lines one inch apart parallel to the center front. Then I started at the center front and added 1" (this would be on the fold so I am adding a total of 2" to the center front) for the center pleat. Next, I cut the pattern on the lines and added 2". I added a total of 9" to my bodice front. Note: before you cut your lines apart make sure you draw perpendicular lines to keep your pattern lined up.

4) To make the pleats: I clipped at the top and the bottom of the pleat. Then I drew lines on the right side of my fabric with chalk on one side of the pleat. Next, I folded the fabric matching the clips for each pleat and stitched on my chalk line. Put a pin in the fold of the pleat. Match the pin to the seamline and press the pleat down.

5) After it was all pleated I reattached the "straps". This completes the bodice front.
SKIRT
This was fairly easy. There was already extra because it was going to be gathered.

SKIRT FRONT
1) In order to get my pleats to match I measured starting at the center front.
Measure over 1" (center pleat) and draw a line parallel to the center front.
Measure over 1" and draw a line.
Measure over 2" (pleat #1) and draw a line.
Measure over 1" and draw a line.
Measure over 2" (pleat #2) and draw a line.
Measure over 1" and draw a line.
Measure over 2" (pleat #3) and draw a line.
Measure over 1" and draw a line.
Measure over 2" (pleat #4) and draw a line.

Measure width of the skirt front. Subtract 9" (this is the # of inches I added for my pleats. ex. 23 1/2" - 9" = 14 1/2"
Measure the width of the bodice front. ex. 12 1/2"
Subtract the width of the bodice from the width of the skirt.
ex. 14 1/2" - 12 1/2" = 2"
The 2" is extra so I folded it out. Now the bodice front matches the width of the skirt front.

The skirt back is altered in the same way that the front. Keep in mind that you are adding a zipper to the center back so leave room.

As I am writing this I realize that this will need visual explanation also. I will be doing a couple of blog posts in the next few days with pictures of the above process.

Other design changes:
I put a ribbon over the seam line all the way around the waist.

Would you sew it again? Would you recommend it to others? Definitely. It is a very cute pattern.

Conclusion: Another fun project. I was so happy with how it turned out. It looks just like I wanted it to. My daughter really liked it too.


As I said above I will be doing a couple of posts that will have pictures of how I added the pleats to the bodice. So stay tuned.

Thanks so much for wading through this long post. Have a great day!

Until next time...

Sunday, April 4, 2010

An Easter Dress for Me: McCalls 5619

I was at Joann's a few weeks ago (when McCalls patterns were on sale) looking for a pattern for my daughter's Easter dress (in a later post). After I found her dress I thought I would quickly skim through the woman's patterns. This pattern caught me right away. How fun would it be to make myself a dress for Easter. I haven't ever done that before.

When I first saw this dress I liked how it was empire but didn't look like it would make you look pregnant. Boy, was I wrong! I didn't read the description. I'm not sure why I didn't read the back because usually I do. But, if I would have I would have know that this dress was loose fitting not close like the picture. Can you see the pleats in the skirt? I can't. As you can tell by the drawing they are there.

For my trial garment I made the dress right out of the envelope. It was huge! It needed some serious adjustments if it was going to fit what I had pictured in my head. It was also a little lower than I liked. After this I set out on a journey to make the tent match what was in my head. Here is my finished dress. This is pretty much what I had pictured in my head.

My review from pattern review: McCalls 5619

Pattern Description: Very loose fitting dress with low elasticized bodice front neckline, gathers at waistline, pleated skirt and back zipper closing. Sleeve Options: sleeveless, short sleeves with stitched hem and elastic, or elbow length with sleeve band. Length mid-knee or above mid-knee.

Pattern Sizing: 6-20 I measured a size 14 (bust) 16 (waist) 18 (hip). I cut out size 14.

Did it look like the photo/drawing on the pattern envelope once you were done sewing with it? I think that my dress ended up looking like the dress on the girl pictured. The description described the dress as loose fitting. I don't think that the picture looks very loose fitting at all. I didn't read the description very well ( I really need to work on this) and went with the picture. Well, this dress is VERY loose fitting. I could have been 8 months pregnant and the dress would have fit well. So, I made a few alterations in order to get it to be close fitting.

Were the instructions easy to follow? They were pretty easy to follow.

What did you particularly like or dislike about the pattern? I didn't like how big it was. But, I will concede that that was partially my fault. The puffy sleeves are not my favorite but I still like the dress.

Fabric Used: cotton

Pattern alterations or any design changes you made: Wow! Where to start?! I made up a muslin just as the pattern was drafted and found out it was a tent.

1) I wanted the neckline to be raised up a bit so I added 3/4" to the bodice front and removed 3/4" from the upper front. I didn't change the bodice back length so I ended up having to put in a bust dart to take out the extra length.

2) The pleated skirt was huge and so I had to get the pleats out so that the skirt had a flat front. This was quite easy. I just folded out the pleated parts all the way down the skirt panel. Once they were out the waistline of the skirt was the same length as the bodice front.

3) There was still quite a bit of room in the back and I wanted it a bit more fitted. So, I put long darts about 3" on either side of the zipper.

Back of dress


4) I added a batiste lining to the skirt.

Would you sew it again? Would you recommend it to others? I probably would not make this again just because it is distinct. I would recommend the pattern as is if you want a loose fitting dress. I would recommend this one if you want to make it more fitted as the alterations are pretty easy.

Conclusion: It turned out to be a pretty cute dress. Surprisingly, I enjoyed trying to make this fit as I had pictured in my head.


This was a fun project! It was such a challenge for me to get it to fit. Getting clothes to actually fit me is one of my challenges. I am pretty happy that I was able to get this to fit.

I will end with this fitting challenge story. The back of the dress was not fitted at all. It was pretty straight through the backside and I wanted to show a bit more curves. So, I started with adjusting at the zipper. I kept moving the zipper over more and more in a bit of a dart effect. After I had basted, tried on, ripped out, repositioned and rebasted a few times the light bulb finally went on in my head. Then I adjusted the back the in a much simpler manner. I put in the zipper just as I would have before (without any funny stuff) and made 2 long darts on either side of the zipper. Worked like a charm!

Thanks so much for stopping by. Have a great day!

Until next time...

Friday, March 19, 2010

What Have I Been Up To...

LOTS!

Sorry there aren't any pictures with this post but that is the one thing I haven't been doing. It has been a very busy couple of months. Unfortunately, blogging has been at the bottom of the list. So what have I been up to?

Sewing--I have made a few garments but I think that only a couple were completely finished. I still have the hem to finish on my first pair of pants I have ever made. I think they fit fairly well. I am not sure why I don't have the motivation to finish them.

Traveling--At the beginning of February I went to Portland. I was there for a Bible Study Fellowship leaders retreat and to FABRIC SHOP! Both were fantastic! One highlight was spending 2 1/2 hours at Rose City Textiles and leaving with about 100 (not a typo) yards of fabric. I brought home so much fantastic high tech knits. I can't wait to sew them up. The other highlight was going to the Pendleton store in Washougal, WA. We took the tour of the factory and it was so interesting. I loved seeing how quality fabric is made. They also sell some fabric in their store there. A lot of it is flawed in some small way so there are fantastic prices. I bought quite a bit of luscious wool fabric. It is gorgeous and now I just have to figure out what to make.

My husband came with me and our 7 year old son (yes, they did go to all the fabric stores with me). It was a great time to spend focusing on our son. We also went to the zoo and OMSI (a science museum). We all had a great time.

Setting up a sewing studio--I decided in January that it was time to teach sewing lessons. I have been thinking about this for a few years but until now it just hadn't been the right timing. So January and February have been full steam ahead getting things in order. The most time consuming part (it took almost a month during which there was no sewing) was cleaning and organizing my sewing space. It was a cluttered mess that needed almost a total reorganization. I LOVE it now. Everything is labeled and has a spot. It is neat and clean and I can walk around the room easily. I joked to my husband that it is now the most organized and clean room in the house. It really helps that every Monday night it has to be cleaned for lessons the next day. I am thoroughly enjoying teaching my students. It is such a joy to do something I really love and make some money too.

Getting a couple new machines--I already had two sewing machines but in order to have at least 4 students in a class I needed buy one more sewing machine. I pondered and researched. I didn't want to pay a lot but I wanted a quality machine that would have a nice stitch and be durable. I was thinking about a Viking Emerald but ended up with a Janome Magnolia instead. It had some really neat features. It is a great machine for a beginner and I have really liked having it for my classes. I think it might become my go to machine for buttonholes. They are super simple on this machine and turn out quite nicely.

I also wanted another serger for the students. Again I didn't want to spend a whole lot but I wanted a quality machine that wouldn't break down a lot and be frustrating to the students. I originally wanted a Huskylock 910. I have a 936 and love it. I thought the 910 would be great because had the great stitch quality but not all the expensive features so I might be able to find one for $700 or so. I ended up finding a person on Craigslist selling an almost brand new Elna 925 for $400. It is an older machine (originally purchased in 1998) but since it hadn't been used much it is in perfect condition. It was high end in it's day. It can even do cover stitch (although I don't need this since I have a cover hem machine and the 936 does it also). I have used it quite a bit and I love it! So, I have been learning two new machines which has been a lot of fun!

Spring Break--My kids had Spring break last week. I am not sure what we did but the time certainly flew by. We got dumped with a few feet of snow so we did spend quite a bit of time outside playing.

Life is starting to settle down a bit and hopefully, soon I can get some pictures of completed garments. I am so behind. I don't think that I even finished up all of my before Christmas sewing. Someday. Today I am focusing on laundry and hopefully getting to some sewing. I should start on my daughters Easter dress. Since the fabric needs to be washed I might cut out a shirt for me instead. I better get started!

Thanks for hanging in there with me! Have a great day!

Until next time...

Friday, January 15, 2010

Computer Confusion!

Our computer was going very slowly so we decided to get a new computer. My husband decided on this:

It is a Mac Mini. I have never used a Mac before so this is quite new for me. So far it seems fairly easy but it is a whole new thing to learn. I liked my Word and now I have to learn something new. Uggh! Getting pictures is also quite a challenge so my blogging has suffered a bit. I have a couple more things to show you from the holidays but I am having difficulty getting the pictures together. I don't have time for this! Oh, well. I think I will be happy eventually. I hope so! At least the internet stays the same. :)

Thanks for stopping by! Have a great day.

Until next time...

Thursday, January 14, 2010

Another "Sweet Sunday" Ruffle Dress

I made this one almost the same as the last one for my niece. You can go here to see that review. The only change was in the sleeve bands. I made one continuous band instead of having a tie. I tried to make a tie but the velvet ribbon I used for the band was too bulky. I really like the simple band.
Ottobre 6/2009 #23

Sleeve Band

I love the fabric for this dress. I picked it up at Joann's a few months ago. They actually had quite a few nice corduroy prints this fall but this one jumped out at me and said take me home. I couldn't resist. My daughter really likes the print too which is a plus.

I am now working on a shirt that was supposed to be part of my wardrobe. I might have it finished in the next couple of days. It has been slow going. Hopefully I can get to fit right.

Thanks for stopping by. Have a great day!

Until next time...

Sunday, January 10, 2010

A Few Blankets

About a year ago I went through all my flannel. I had quite a bit of it from Joann's black Friday sales and I needed to make room for new fabric. I bought most of it when my daughter was little. Now, she is big. Way to big to have pj's made for her out of this cutesy stuff. I decided to make up some of the flannel into blankets to donate somewhere. So, the fabric sat for a year or so just waiting to be used. I finally got around to doing it the last couple of days. They were each pretty quick to make. I cut a 36" square with rounded corners. Serged wrong sides together leaving an opening. Turned it inside out and used a 2 thread overlock stitch with decorative thread to finish the edge.

Here is my pile of blankets. Now I just have to figure out where to take them. I have so many options.
This one is my favorite. I love the plaid with the cute little princesses.

Now, for just a teaser of what I am working on. Last night I cut out the dress for my daughter from the same pattern as the Christmas dress for my niece. I put the bodice together this evening. My goal was to have it finished for her to wear to church tomorrow. But I am really tired and instead of staying up a couple more hours filled with silly/frustrating mistakes I think I am going to go to bed. She can wear it next week.

Sleeve

Thank you for stopping by. Have a great day!

Until next time...

Tuesday, January 5, 2010

Free Audio Story!

This has absolutely nothing to do with sewing unless you like to listen to them as you sew. I was pointed to this website, Home School Radio Shows, from The Money Saving Mom. My family LOVES audio stories so I jumped on this right away (we listen to a lot of stories in the car). I thought some of you might enjoy this too.


The Long Winter

By popular demand, we again present this fine interpretation of Laura Ingalls Wilder's "Little House" book, "The Long Winter". This Ingalls family is quite different than the one you saw on TV, but it is a very faithful adaptation of the book, and is quite entertaining. It is the ONLY "old time radio" adaptation of any of Laura Ingalls Wilder's books, and you love those stories, you'll treasure this. This broadcast was originally aired way back in 1950 on the radio version of the Hallmark Playhouse.

If you click here you can download this story along with two others for free. Enjoy!

Thanks for stopping by. Have a great day!

Until next time...

Birthday Kuspuks for my Nieces

All of my nieces have their birthdays in November and December. I find this to be really inconvenient (like it was at all up to me). I love to get them presents and I only get to do it once a year because their birthdays and Christmas are so close together. Plus, all the sewing for them is done at one very crazy time. This year I did more sewing for them than usual. I already posted my 6 year old niece's Christmas dress. This post will be about the Alaskan kuspuks I made for my 6 and 3 year old nieces for their birthdays.
Kuspuks are traditional Eskimo dress for men and women. There are different types for different times of year. For the winter they are made of fur and are very warm. I saw quite a few of these on New Year's Eve when we went to see the fireworks. They looked so warm and cozy. The summer style is usually made out of cotton. For women and girls they can be a shirt or a dress or a coat. The version for men and boys (snowshirts) are the same style with out the ruffled skirt and can be used as shirts or coats. They are a very versatile piece of clothing.

Front of Kuspuk for 6 Year Old
(My son is modeling and I promised his face wouldn't show.)

Back
Kuspuk for 3 Year old
(She has plenty of room to grow.)

Pattern Description: The kuspuk is a light fabric parka that is worn in Alaska during the summer. Eskimo women make it in bright prints and wear over their fur parkas in winter to protect the fur.

This pattern by Lois is designed so the flounce may be left off during construction of the garment to make a boy's parka or a shorter summer parka. The garment slips over the head and has a front zipper. Almost any type of colorful material may be used, although the fabric should be durable. Decorative braid or rickrack is used to trim the garment.

Pattern Sizing: I purchased 6-8 (child) but they are available in toddler up through adult sizes. I made the 6 for the 6 year old and sized down a bit for the 3 year old.


Did it look like the photo/drawing on the pattern envelope once you were done sewing with it? Yes. The picture on the front is a pretty basic sketch but my garment looked pretty much like the sketch.

Were the instructions easy to follow? They were okay. Most was fairly clear. They didn't give clear directions about attaching the pocket or placement lines where to place pocket. Zipper instructions were also very sketchy.

What did you particularly like or dislike about the pattern? I liked that it is an authentic pattern created by Alaskans and used by Eskimo women. It is a very cute shirt/dress. It can be worn for a while even as a child grows because it can be a dress or shirt.

Fabric Used: cotton
I purchased years ago probably from Joann's.

Pattern alterations or any design changes you made: I didn't put in a zipper. I wanted to use my new snap press and snaps so I adapted the pattern. All I did was add about 1 1/4" to the center front of each front piece. I also folded the flounce in half and gathered it to the top so that it wasn't as long and I didn't have to hem.


Close Up of Snap Front

Would you sew it again? Would you recommend it to others? My daughter would like on but right now I don't feel like making this again when I have so much else I would like to sew. I would recommend this pattern to others if they want and authentic Alaskan garment.

Conclusion: A pattern with sketchy instructions but worth making if you would like this type of garment.


You can purchase this pattern through Northern Threads in Fairbanks, AK.

Thank you so much for stopping by. Have a great day!

Until next time...

Sunday, January 3, 2010

A Christmas Dress for My Niece


I made a dress for my 6 year old niece for Christmas. I immediately loved the picture of the "Sweet Sunday" Ruffled Dress in the Winter '09 Ottobre magazine. I knew that I just had to make this dress. I thought this would be a perfect style for my niece. I liked how the pattern was so unusual. I had so much fun making this one. I want to make another one for my daughter in a bit more sophisticated fabric. She absolutely did not like the picture once she saw it but I had her try on the one for her cousin and really liked it. YEAH! I get to make one for her too.

Front
Back

Note: You might be interested to know why my son is modeling this dress. It was part of his punishment. He decided to mess around with a permanent marker (which is not allowed for obvious reasons) while his brother was trying on the dress for me to check the fit (my youngest is about the same size as my niece who doesn't live nearby). I think you can imagine what happened next. YES! He got black permanent marker on the dress! I am sure you know how upset I was. He missed out on going to a movie with his grandparents and had to model the dress. BTW, I was able to get out most of the marker with rubbing alcohol. You would have to look very close to see the disaster.

On to the full review:

Ottobre 6/2009 #23

Pattern Description: A girls dress that has a well fitted bodice in contrast to the fullness of the skirt with its three overlapping ruffles.
The sweet ruffled dress is sewn form velveteen. The bow, sleeve bands and neckline trim are cut from shiny satin. The underskirt of the dress, to which the two lowest ruffles are attached is also cut from satin. The sleeve edges are gathered to bands the ends of which are tied in bows. The dress has an invisible zipper on the back.

Pattern Sizing: size 92-128 According to my niece's measurements she was a 116 chest and waist with a 128 waist. I made a 122 and I thought it ended up a little big. I think this dress is kind of roomy.


Did it look like the photo/drawing on the pattern envelope once you were done sewing with it? My dress looked very much like the pictured dress.

Were the instructions easy to follow? Yes they were easy to follow for an Ottobre pattern.

What did you particularly like or dislike about the pattern? I really like the style. It is different than what you see in RTW but yet very RTW looking. I immediately love the shape of the neckline.

I did have a little difficulty stitching the middle layer to the satin because it so slippery. Before I read the instructions completely I thought the skirt was 3 separate full layers. I was disappointed it wasn't because I wanted to take off the top two layers to make a less ruffly dress for my daughter who didn't like the frillyness. They way they have you construct the dress makes for far less bulk and probably more twirliness (is that a word?).


Fabric Used: I used a stretch cotton woven fabric that I picked up from the back wall at Denver Fabrics.

Pattern alterations or any design changes you made: I didn't add the bow. I also used knit for the neckline ruffle and the sleeve bands. By using this heavier fabric I couldn't tie the bands into bows. I had to just knot them and cut and resew the ends so they weren't so long. My neckline ruffle falls forward a bit so I had to tack the facing down.

Would you sew it again? Would you recommend it to others? Definitely! I already have the fabric and permission from my daughter to make one for her.

Conclusion: I love how cute this one turned out. It is so different and stylish. LOVE IT!


Thank you so much for stopping by! Have a great day.

Until next time...

Saturday, January 2, 2010

1st Garment of 2010: Jalie 2911 Pink Fleece Hooded Pullover

Don't I look so comfy in my fleece shirt and cozy fleece pants? This is my usual at home attire. I LOVE fleece!

This shirt is actually garment #5 of my wardrobe plan. Boy was that a bust! Not the shirt, the wardrobe plan. I finished two of my planned skirts and two shirts. I liked each garment I made (I will review when I get pictures), one outfit in brown and one in burgundy. Although these colors look nice together the styles of the skirts and shirts did blend well. I was frustrated with my choices. In order to complete the wardrobe I would have to take out two of these items and add two more. Plus, this shirt really wouldn't go with all the bottoms. So, knowing these hurdles and the need to complete Christmas clothes for my kids and presents for neices and nephew I decided to chuck the wardrobe plan. I will make the garments I was planning but they will not all go together. That's fine with me.

Back to Jalie 2911. I really like how this turned out. I did have a bit of puckering at the base of the collar. It is okay. Next time I make this I will work on getting rid of the puckers. The back also has a few wrinkles (not shown) that will need addressing with a sway back adjustment. I am really going to enjoy wearing this. The fleece is so soft and comfortable!

My Review on PatternReview:


Pattern Description: Woman's pullover with Hood or Shawl Collar

Pattern Sizing: toddler girls -- women's plus sizes

Did it look like the photo/drawing on the pattern envelope once you were done sewing with it? My version looked just like the picture.

Were the instructions easy to follow? They were okay. I had a bit of trouble understanding how to attach the hood/shawl collar. I did get it together but I have a slight bit of puckering at the bottom corners.

What did you particularly like or dislike about the pattern? I really like how comfortable this shirt turned out. I think the fit on me resembles the fit on the model.

Fabric Used: Light pink Polartec 100 by Malden mills that I picked up from my local sewing store, Seams Like Home.

Pattern alterations or any design changes you made: I ended up taking in the sides because I wanted a little bit more fitted look. I also added a 1/4 inch to the pattern at the bicep for a bit more room.

Would you sew it again? Would you recommend it to others? I will make this again and would definitely recommend this to others. It was a pretty quick pattern to sew up and I really like the result.

Conclusion: I am already trying to figure out if I have some fabric to make this again. I think next time I will use a knit and do some more shaping. I will have to address the extra fabric at my lower back. I think I will need a sway back adjustment. It is fine in this shirt but if I use a knit I think I would like it to fit just a bit better.

Thanks so much for stopping by! Have a great day!

Until next time...

Friday, January 1, 2010

Looking Back, Looking Forward!

A Few of my favorites from 2009


2009 is over. It was a good year for us. God blessed us in many ways and I am very thankful for His watching over us. I am excited to see what 2010 brings. Whether it be joy or sorrow I know that God has us in his hands all through the year.

Last year I wouldn't make any resolutions. As I said last year I don't like them because I never keep them. I just gave myself a list of things that I wanted to accomplish throughout the year. I thought I would reflect on last years accomplishments and add my thoughts for next year.

1. I want to purchase better quality fabric. I have a tendency to gravitate toward good deals. I need to put more quality stuff into my stash that I would actually want to wear. I also want to concentrate on coordinating fabrics and not just purchase things singly that I later have to find something else to match. I did pretty well at this this year. I purchased quite a bit of nice fabric (most of which I got for great prices). I ended up with lots of nice wicking knits, high quality fleece, some nice wools, quality cottons and nice fashion knits. I am very pleased with what was added to my collection this year. My problem now is that I do not have very much to use for muslins. I would like to continue this through 2010 (hopefully at the NY and LA garment districts).

2. I want to spend more time crafting and not just vegging out. My main time for crafting is the evening and I am often pooped. I don't want to do anything but when I don't do anything I feel like I wasted a bunch of time. I will still veg out I would just like to do it a bit less. I did better at this also. My completed garment count will verify. I completed a total of 37 garments using up 61 yards of fabric. This certainly is not as many garments as some but I am very happy with what I completed. I did veg out a bit but I did a lot of sewing too. This is a goal for 2010 also. I don't necessarily have a goal to complete more garments than last year or to use up more of my collection but I want to spend time sewing consistently.

3. I want to finish sweaters (and sewing projects for that matter) within a reasonable amount of time (not two years). I have been getting better at this and want to continue this success. Totally failed! I don't think I hardly picked up my needles all year. Maybe I will pick up my needles this year. No pressure though. Only if the knitting spirit moves me.

4. I want to sew more for myself which would then include increasing my fitting skills. I definitely worked on this this year. I made 10 garments for myself. A few turned out to be wadders but I learned from my mistakes. I definitely want to increase my fitting skills this year. There are quite a few Burda garments that I am itching to make.

5. I want to make a chart to keep track of my projects. I really like the chart Karen made and want to borrow the idea. This will really help me see my accomplishments and be a motivator. Then at the end of next year it will be easier to count up my projects and yardage. I would really like to know exactly what I made and how much fabric I used. Oh, and I would like to fill the chart by the end of the year. Completely neglected. Hopefully I will do this soon.

6. Lastly, I would like to figure out my camera and learn how to take better pictures. My pictures don't have to be museum quality just better than they are now. I really want to get some good pictures of my kids. Worked with my camera some. My goal for 2010 is to take a picture every day. I have a separate blog for these pictures. I haven't done well in the past with this challenge for myself. Hopefully this year will be more successful.

2009 Garment breakdown
Made for Me--10
dresses 2
tops 5
skirts 3
Elianna--9
dresses 3
tops 3
pants 1
skirt 1
jacket 1
Seth--8
shirts 6
pants 2
Silas--5
shirts 5
Nieces--4
kuspiks 2
dresses 1
skirt 1
Nephew--1 robe

I have quite a few garments to show you (11 to be exact plus one I am finishing as soon as I post this) over the next little while. So stay tuned.

Thanks so much for stoppin' by. Have a great day!

Until next time...